


Follow these simple steps to customise the unread mail settings in Outlook to change how unread emails look and when and how they get marked as read.
Unread emails can easily get lost in a sea of unopened ones when they look so similar. It can be frustrating and overwhelming, especially when emails are marked as ‘read’ when you’ve only clicked on them, but not yet read them.
Read on to get the easy fix that will save you a world of pain.
Note: The steps and images shown in this post are for Outlook for Office 365 (Windows desktop version 1902, March 2019). Some things may look a little different if you are using another version of Outlook, but the general process will remain the same.
Make your unread emails stand out in the Outlook inbox
If you find the default appearance of unread mail too subtle, you can customise the colours and fonts used to make unread mail really stand out in your inbox.
Here’s how to do it:
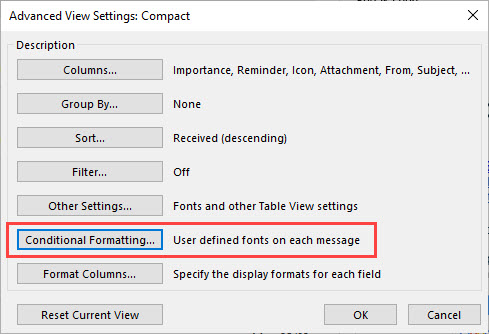
1. Select the View tab, then View settings.

2. Click the Conditional Formatting button.
3. Click on the Unread messages rule to select it, then click the Font button.
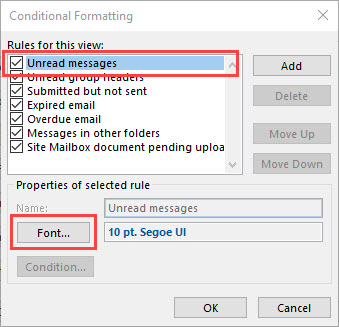
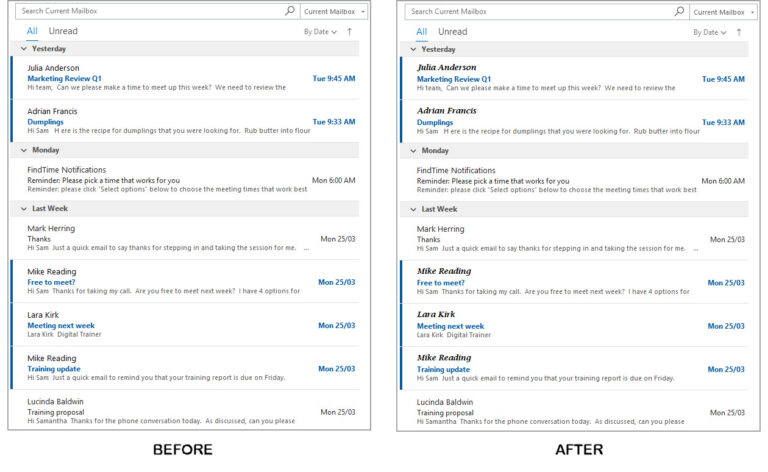
4. Choose a font, font style, size and colour that will make your unread emails really stand out in your Inbox. Here is a before and after image to show you what a difference this can make. I’ve kept these changes minimal, but it has still made the unread emails easier to distinguish.
Change how and when an email is marked as read in Outlook
There are two settings in Outlook that control how and when an email is marked as read. Both involve what happens to mail when it is viewed in the Reading Pane (the box on the right hand side that displays a message).
To find and edit these settings:
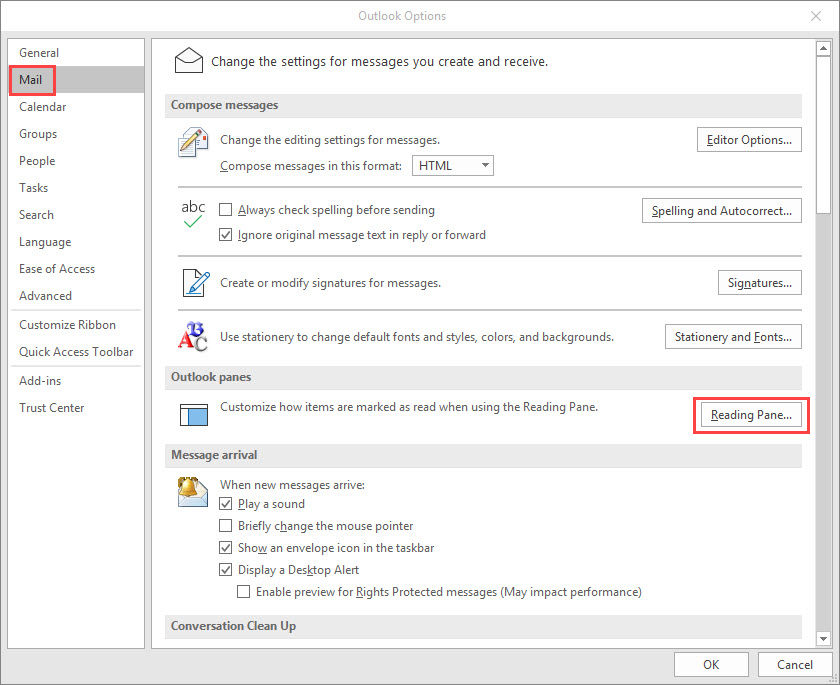
1. Select the File tab, then Options.
2. Select Mail from the left-side menu, then click the Reading Pane button.
3. Tick, un-tick or edit the following two settings to suit your needs. You can either disable both settings (which means you will need to manually mark messages as read), or choose the one that you prefer.
- Mark items as read when viewed in the Reading Pane: When you click on an unread email in your Inbox and it is displayed in the Reading Pane, Outlook marks the message as read after a default of 5 seconds. You can disable this completely, or increase the number of seconds that Outlook will wait before marking the message as read.
- Mark items as read when selection changes: Outlook will mark a message as read when you have clicked on it, and then move away from it and click on another message (i.e. your message selection changes).
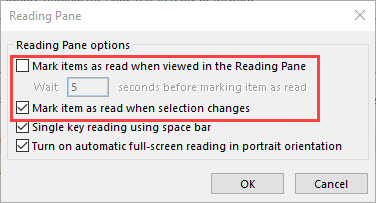
4. Click OK when you are done.
You may need to experiment with these two settings to find the option that works best for you. If you do need to manually mark a message as read or unread, a quick way to do it is by using the following keyboard shortcuts:
- Mark a message as read: Ctrl + Q, or Cmd + T on Mac.
- Mark a message as unread: Ctrl + U on Windows, or Shift + Cmd + T on Mac.
Here’s a full list of Outlook keyboard shortcuts for Windows and Mac if you’d like to save even more time!
Interested in getting more efficient with Microsoft Office 365 tools?
Contact us to find out more about our face-to-face and online training options for your organisation.
Prefer to see these search tips in action?
Check out our video below.


