In this blog post, we’ll show you the quickest and easiest way to move your YouTube channel to another Google account. Even better, we’ll show you how to do so without changing the channel URL or losing any of your subscribers. This process works for both primary YouTube channels (the one with the same name as your Google account) and any additional channels you have created (those connected to a Brand Account).
Moving your primary YouTube channel to another Google account
Step 1: Create a new channel via a Brand Account
Step 2: Connect your existing channel to the Brand Account
Step 3: Transfer ownership of the Brand Account.
Moving a Brand Account channel to another Google account
Step 1: Add the other Google account as a channel owner
Step 2: Accept the invitation from the other Google account.
Step 3: Wait for 24 hours
Step 4: Change the other Google account to be the Primary Owner of the channel
Step 5: Remove permissions from the old Google account [optional]
Important notes before you start
Moving a YouTube channel will retain:
- The channel URL
- Videos
- Subscribers
- Likes
- Comments made by others
The following are not retained when you move a YouTube channel:
- Custom URLs
- Comments made by the channel
- Sent and received messages
- Verification badges
- Automated filter community settings
Please read this article for updated information about what is and isn’t retained.
Moving your primary YouTube channel to another Google account
Step 1: Create a new channel via a Brand Account
To move your primary YouTube channel between Google accounts, you first need to move it to a Brand Account. Follow these steps to create a Brand Account channel that you can move your primary channel to.
Note: If you already have a Brand Account channel you want to use, you can skip ahead to step 2. However, please make sure this channel is not already used for another active YouTube channel. If you’re not sure if your channel is already connected to a Brand Account, follow these instructions.
1. Login to YouTube with the Google account that currently owns the channel.
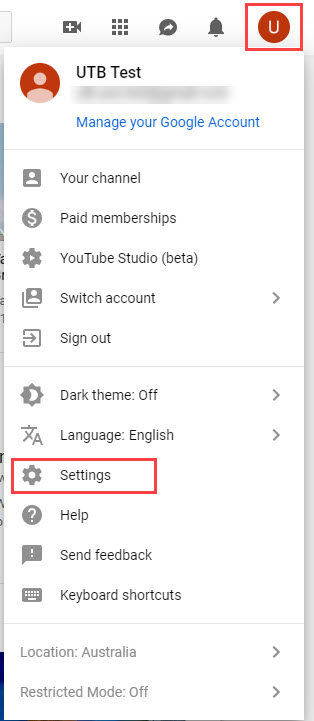
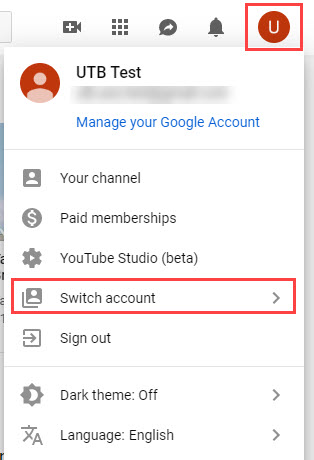
2. Click the profile image in the top right corner of the screen and then click Settings.
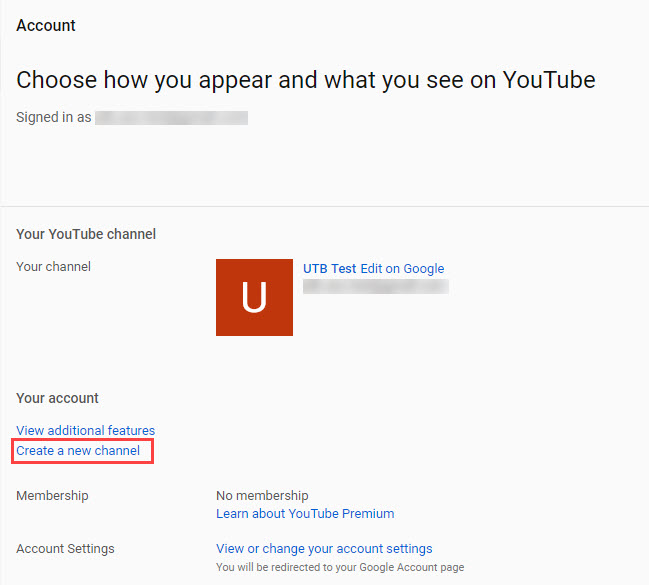
3. Select the Create a new channel link.
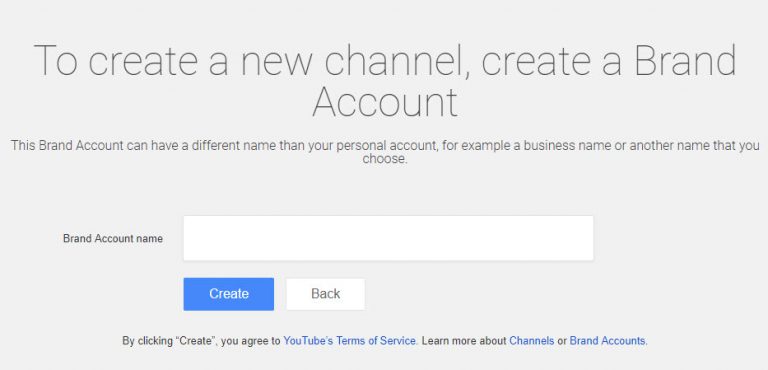
4. This will launch the Brand Account creation page. Enter a name for the Brand Account. This is going to be the name your channel takes on after the move. Click Create.
Note: I did experience issues when trying to create a Brand Account with the same name as my primary channel. Although there was an error, the account was created. If you experience an error and the account is not created, you may need to create a Brand Account with a slightly different name.
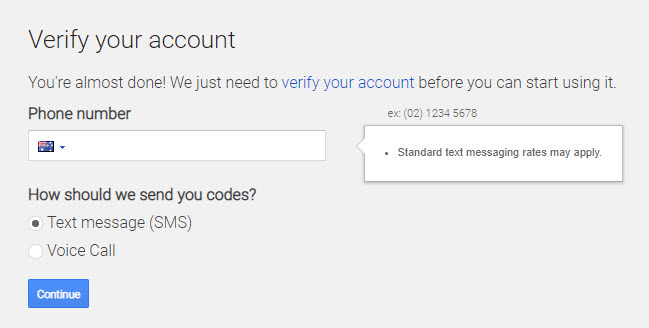
5. Enter a phone number to verify the account. Click Continue.
6. Enter the verification code sent to you and click Continue.

The Brand Account and its associated channel have now been created.
Step 2: Connect your channel to the Brand Account
Now that you have created a new channel to use as a Brand Account, you need to connect your primary channel to that account. Follow these steps:
7. Click the profile image in the top right corner of the screen and switch back to the channel you want to move. Please ensure you select the right channel so you don’t move the wrong one!
Note: If you are already using YouTube as your primary channel, skip this step.
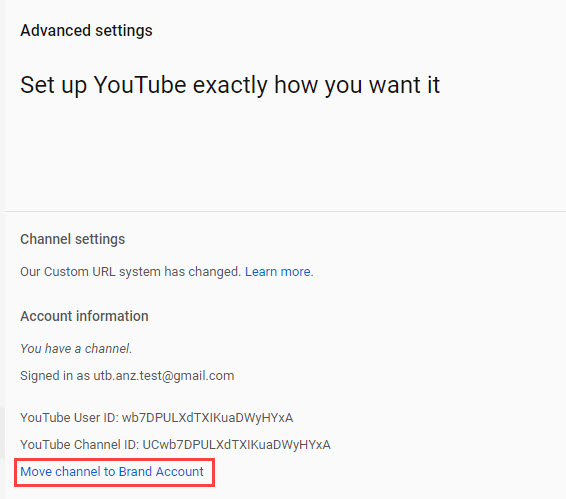
8. Visit your advanced account settings (http://youtube.com/account_advanced) and click the Move channel to a Brand Account link.
9. Re-enter your Google account password if prompted.
10. Choose the Brand Account that you want to transfer the channel to.
Note: If the Brand Account you created earlier is not shown here, it may be due to the issue (mentioned in step 4) that can occur if you create a Brand Account with the same name as your primary channel. Try navigating to the new Brand Account and accessing its channel to ensure it has been created properly.
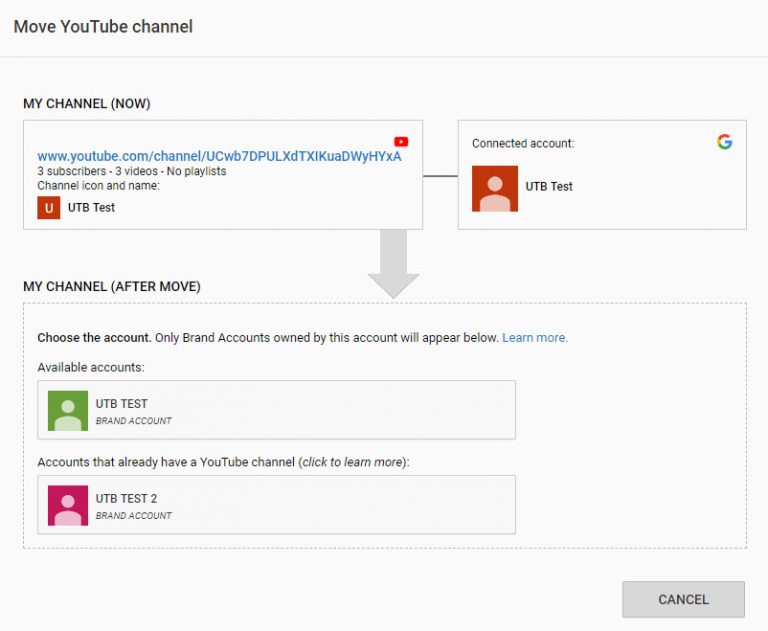
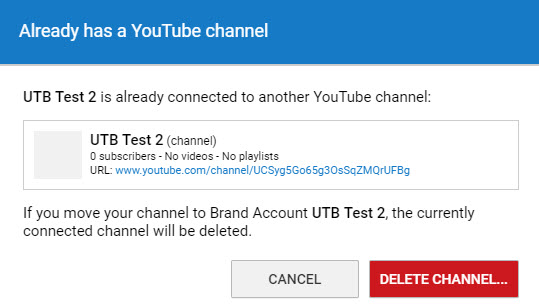
11. You may be warned that the Brand Account you selected is already connected to another YouTube channel, and prompted to delete the other channel. Read the warning below and then click Delete channel if you want to continue.
WARNING: If you have chosen to use a Brand Account you already had, make sure the associated YouTube channel does not contain any content you are actively using or want to keep.
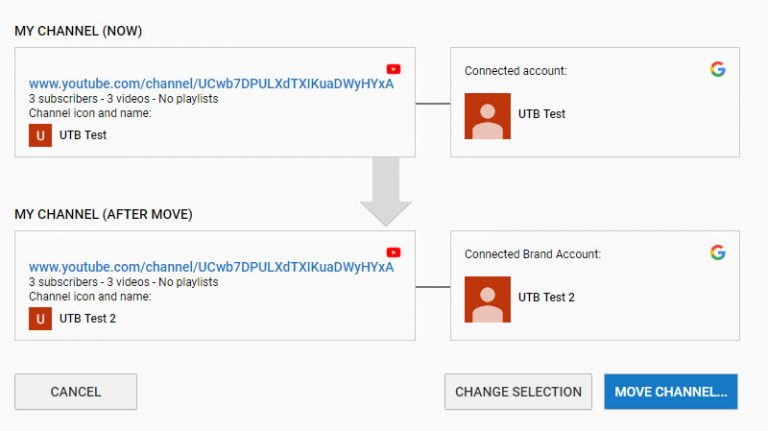
12. A summary of the move will be displayed. Click Move channel to complete the process.
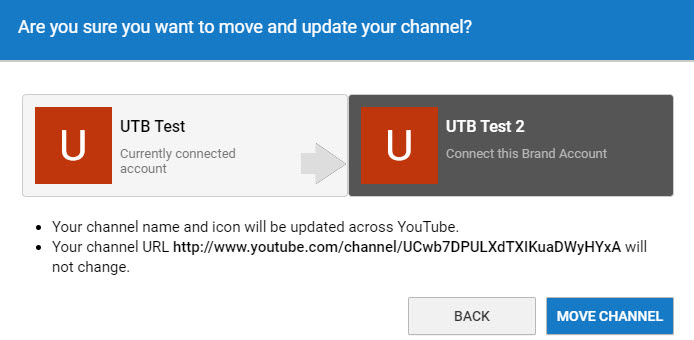
13. Click Move channel to confirm.
14. You will be notified about the successful channel move. Click OK.
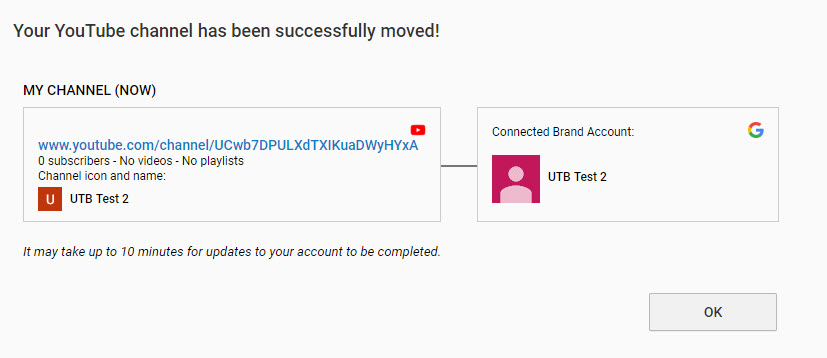
Note: The first time I attempted to move this channel, I experienced a white screen with no notification about the successful channel move. If you experience this, please repeat steps 7-14 again.
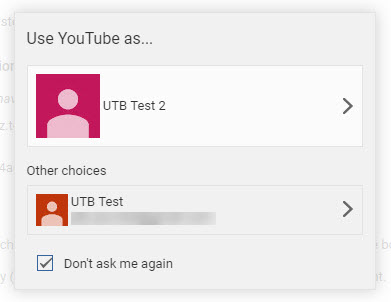
15. If prompted, choose to use YouTube as the new channel.
Step 3: Transfer ownership of the Brand Account
Now that your primary channel is a Brand Account, you can follow the steps in the next section to move a Brand Account channel to another Google account.
Moving a Brand Account channel to another Google account
If you’re not sure if your channel is already connected to a Brand Account, follow these instructions.
To move a Brand Account YouTube Channel between accounts, you need to transfer primary ownership of the Brand Account by following the process below.
Step 1: Add the other Google account as a channel owner
1. Login to YouTube with the Google account that currently owns the additional channel.
2. If prompted, select to use YouTube as the additional channel.
Note: if you are not prompted, click the profile image in the top right corner of the screen to check you are using the Brand Account channel. Choose Switch account if you need to move between channels.
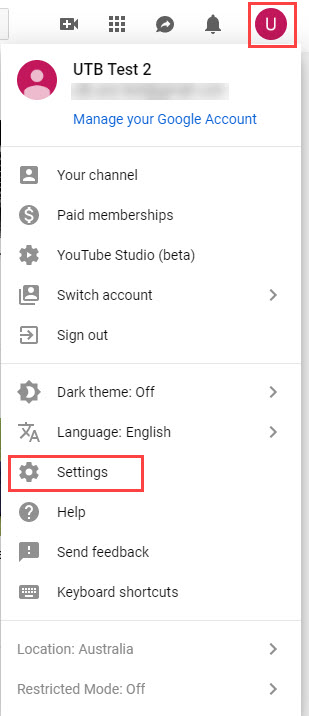
3. Click the profile image in the top right corner of the screen and then click Settings.
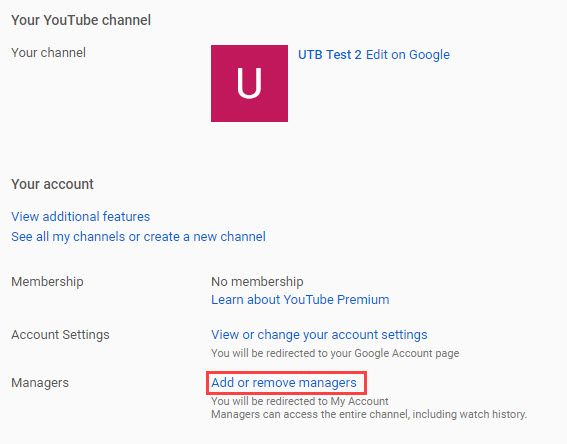
4. Select the Add or remove managers link.
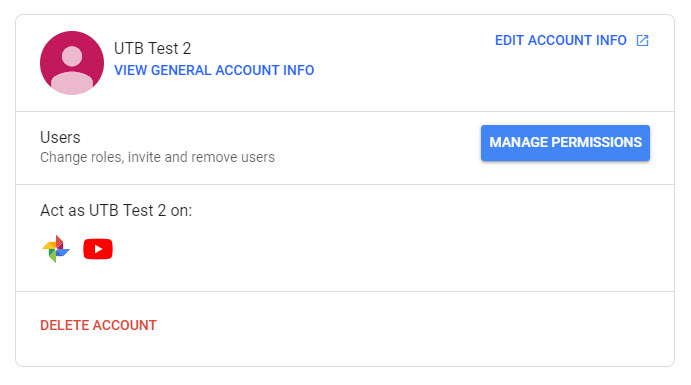
5. Click Manage Permissions.
6. Click the Invite new users icon.

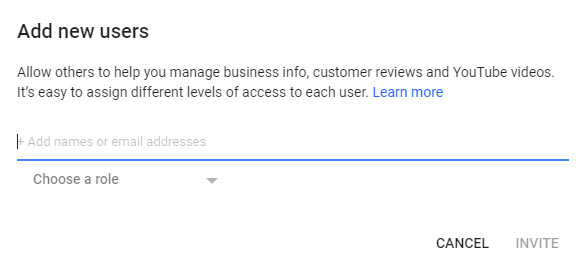
7. Enter the email address of the Google account you want to become the new owner. Click the Choose a role drop-down and select ‘Owner’. Click Invite.
8. Click Done.
Step 2: Accept the invitation from the other Google account
9. Login to Gmail with the Google account that you invited as an owner.
10. Locate the email notifying you of the ownership invitation. Click the Accept invitation button in the email.
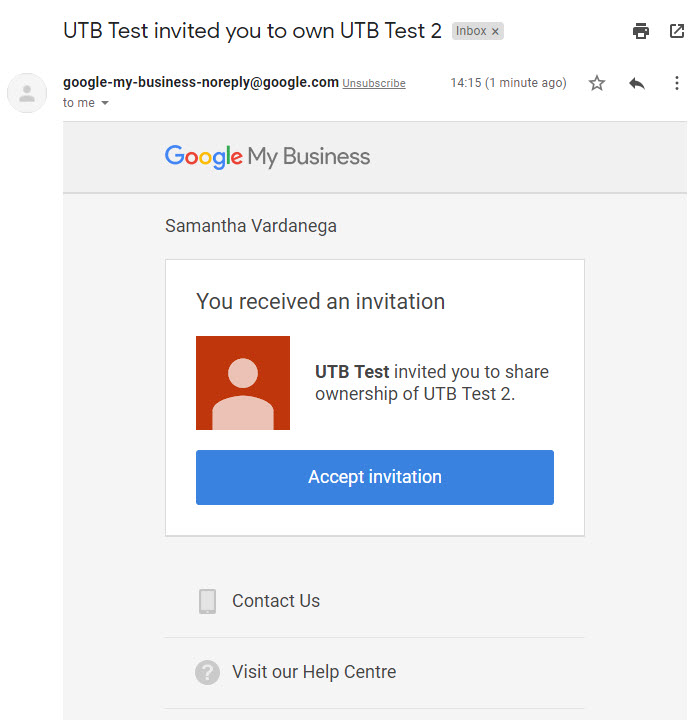
11. Open YouTube and check that the account has access to the channel (click the profile image in the top right corner of the screen and choose Switch account).
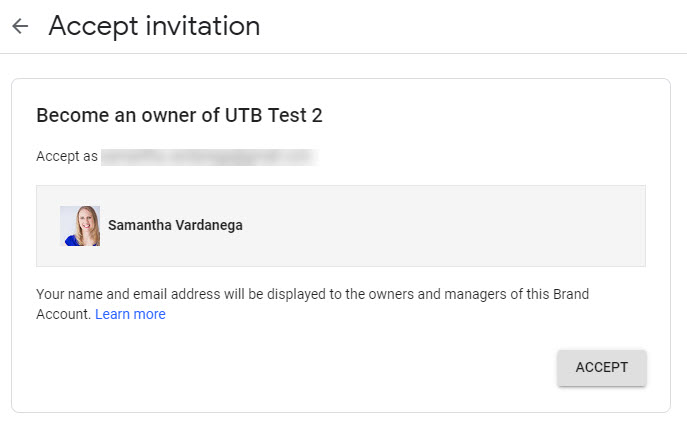
12. Access YouTube and check that the account has access to the channel from the profile image in the top right corner of the screen.
Step 3: Wait for 24 hours
That’s right, now it is time to wait. The very last step in the process cannot be undertaken until the newly added Google account has been an owner for at least 24 hours. See you tomorrow!
Step 4: Change the other Google account to be the Primary Owner of the channel
So now that you have waited for 24 hours, it is time to complete the process.
13. Login to YouTube with the Google account that currently owns the channel you want to move.
14. Click the profile image in the top right corner of the screen to check you are using the Brand Account channel. Choose Switch account if you need to move between channels.
15. Click the profile image in the top right corner of the screen and then click Settings.
16. Click the Add or remove managers link.
17. Click Manage Permissions.
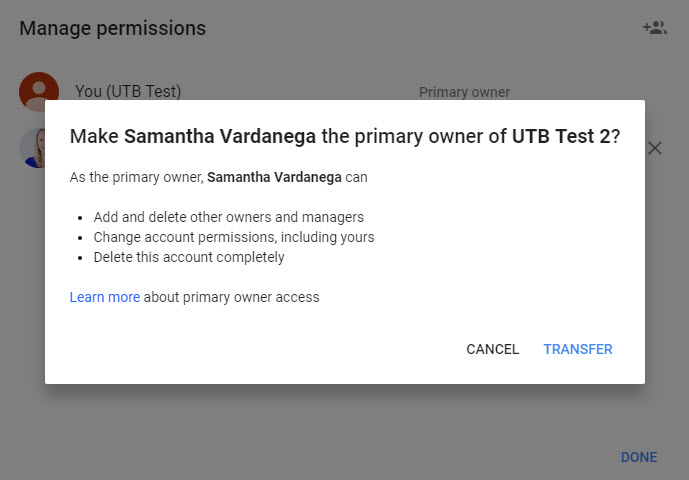
18. Click the drop-down box next to the name of the Google account you want to transfer the channel to. Change their role to Primary owner.
19. Read the implications of making the other person a primary owner. Click Transfer.
Step 5: Remove permissions from the old Google account [optional]
If you want to completely remove your old Google account from the channel, you can do so by following the steps below.
20. Login to YouTube with the Google account that is the new owner of the channel.
21. Click the profile image in the top right corner of the screen to check you are using the Brand Account channel. Choose Switch account if you need to move between channels.
22. Click the profile image in the top right corner of the screen and then click Settings.
23. Select the Add or remove managers link.
24. Click Manage Permissions.
25. Click the X next to the name of the old Google account.
26. Click Remove to confirm the action.
If you’d like to see a video about how to add or remove managers, check out this one below.


