


Use your photos app for more than just a standard image.
One of the great, yet under–utilised, features of an iPad is its ability to Markup photos. This is a great tool for teachers to use in their classrooms to help students learn, collaborate, and communicate. Essentially, being able to draw all over photos takes a simple photo from a still image to something interactive that can enhance teaching and learning. Here are some tips and ideas on how to use mark up for photos on an iPad in the classroom.
Getting Started
First, open the photo you want to mark up in the Photos app. Once the photo is open, tap the edit button at the top right corner of the screen. This will bring up the editing tools. To start marking up the photo, tap the “Markup” button on the top left, which looks like a pen icon. This will bring up the markup editing tools.

Note: If you have very old iPads, the Markup icon may not be there when you click edit. Try updating the iPad to the newest software update in Settings > General > Software Update. If it is still not there, then this means the iPad is too old and unable to have Markup installed.
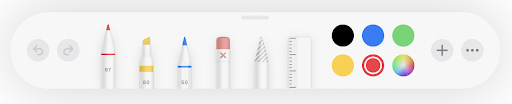
The Tools You Can Use
There are many tools to choose from when marking up your photos. In the markup tools, you can draw, type, and add shapes to your photo.
To draw, simply select the drawing tool and use your finger or Apple Pencil to draw on the photo.
To add text, select the text tool, tap where you want the text, tap the word ‘text’, and type in your text.
To add shapes, select the shape tool and choose the shape you want to add.
Saving or sharing Photos
Once you are done editing the photo, you can save it and share it with your students. To share the photo, tap the share button at the top left corner of the screen. You can then choose how you want to share the photo, such as via email, text message, or Airdrop.

Ideas for the Classroom
Teachers can use Mark Up to:
- highlight important points,
- draw diagrams,
- provide explanations,
- show a diagram of an object and ask students to label the parts.
Students can use Mark Up to:
- draw on a photo of a painting or photograph and analyse the content,
- draw on a photo of objects to identify a letter/ sound/ number of items,
- add speech bubble shapes to pictures of themselves and put text on the bubble to show learning
- use the draw tool and the pick colour tool to match the colour of a person in a picture and draw them as a cartoon.
In conclusion, using mark up for photos on an iPad in the classroom can be a great way to engage and motivate students. With its easy-to-use tools and features, mark up for photos on an iPad provides educators with a great way to get their students thinking and collaborating. So, if you’re looking for a way to make your classroom instruction more interactive and engaging, consider using mark up for photos on an iPad.
See how your skills stack up by completing our Apple Skills Checklist.
Sign up for our Learn on Demand package where you can access regularly updated materials on Microsoft, Google, Apple and AI tools.
You can also check out what trainings we offer specifically for Apple here.


