If your school uses Microsoft Office 365, you and your students will probably have access to Microsoft Stream. This video tool makes it very easy for teachers and students to securely share videos within classes and the wider school. The best part is that it is integrated with Microsoft Teams, so if you are already using a Team with your class, it’s super easy to start using Stream with them too. In this blog post, I’ll show you how to use Microsoft Stream to share videos with your class, and how to set it up so that students can also share videos with you and the class.
Note: Before planning to use Microsoft Stream with your students, it is a good idea to ask your Office 365 administrator (usually your IT support team) if the service is enabled for teachers and students.
Step 1: Access Microsoft Stream
1. Sign in to your Office 365 account with your school login.
2. Look for the Stream icon on the Office 365 landing page. If you don’t see it, click Explore all your apps. You can also use the link https://web.microsoftstream.com/
Note: If you still do not see Stream in the list, or the above link does not work, your Office 365 administrator may have disabled the service. Have a chat to them and see if you can get the service enabled.
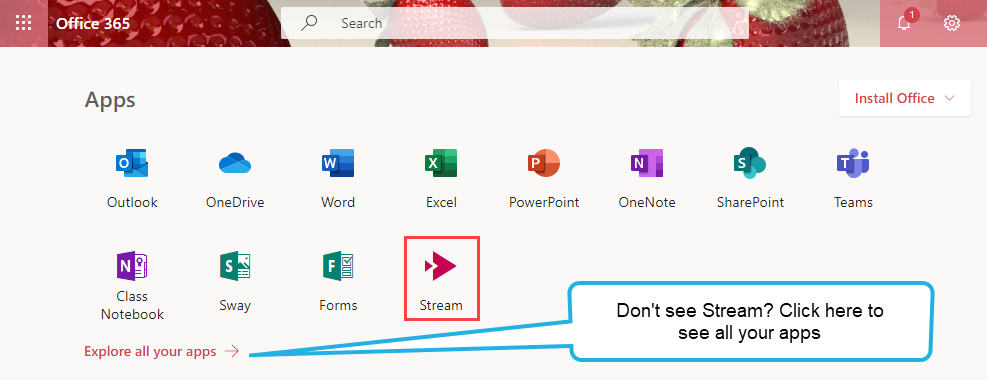
3. Click the Stream icon to open Microsoft Stream. You will be taken to the home page.
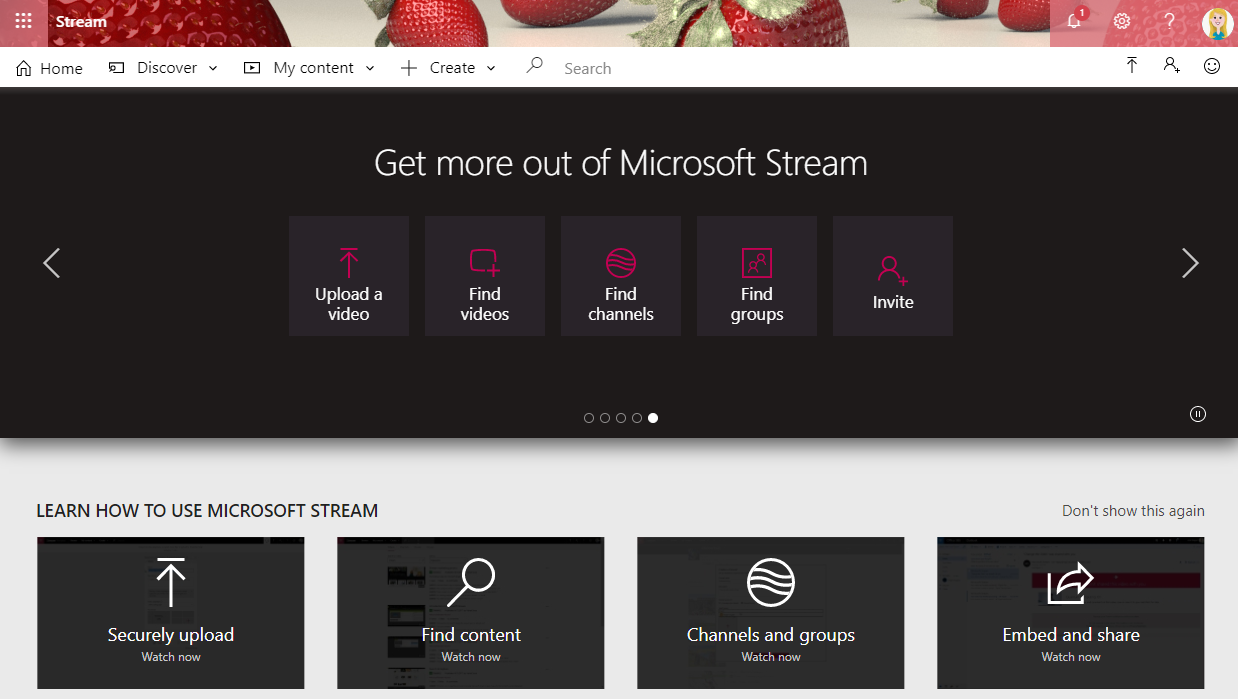
Note: These are the same steps that your students can use to access Microsoft Stream.
[bctt tweet=”#Microsoft #Stream is a great way to securely share videos with your class. Here’s how to get started” username=”samvardanega”]
Step 2: Create a Group for your class
Groups in Microsoft Stream are used to securely share content with specific people. They are based on Office 365 Groups. As such, if you’re already using Microsoft Teams with your students, you will already have a group for them in Stream. Even if you’re not using Teams, you may also have a group that has been created by your Office 365 administrator for another purpose. So, let’s start by checking your existing groups.
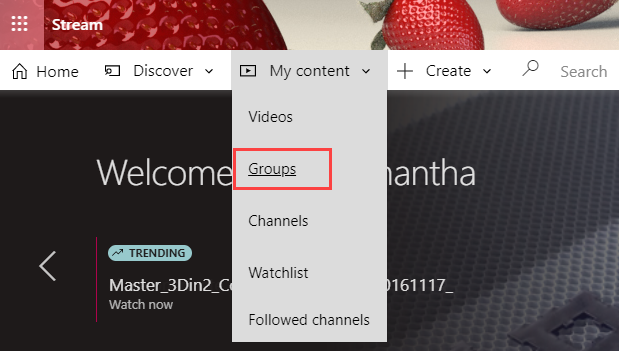
1. Click My content in the top toolbar > Groups.
2. A list of all your Groups will be shown.
Note: Your students can also use steps 1 and 2 to access the Groups they are members of.
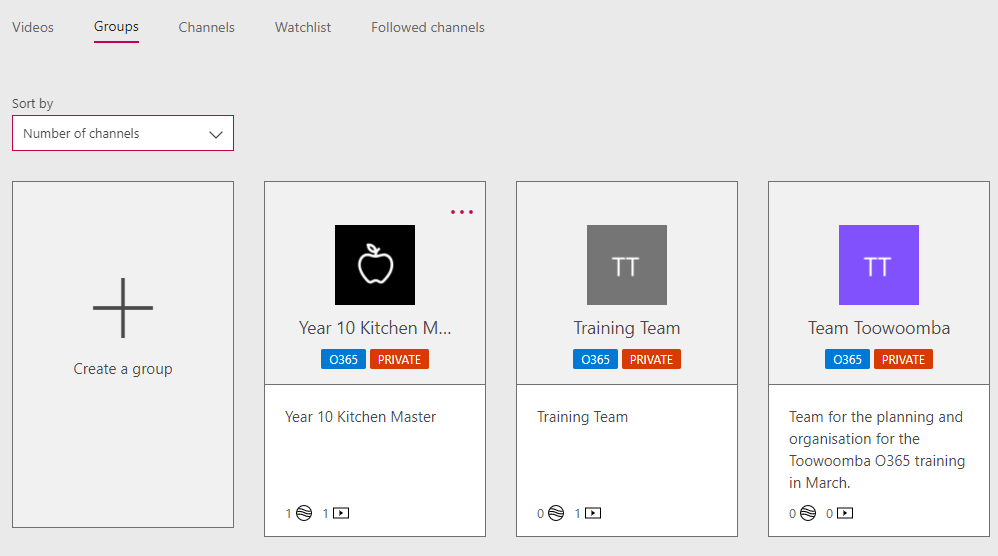
3. Browse the list to see if you already have a group for your class. If yes, then skip ahead to section 3 of this post. If you don’t have a group, stay here for the next step!
4. Click Create a group.
Note: If you don’t see this option, your ability to create groups may have been restricted by your Office 365 administrator. Ask them to create a group for you and make you a manager. Once you have done that, skip ahead to section 3 of this post.
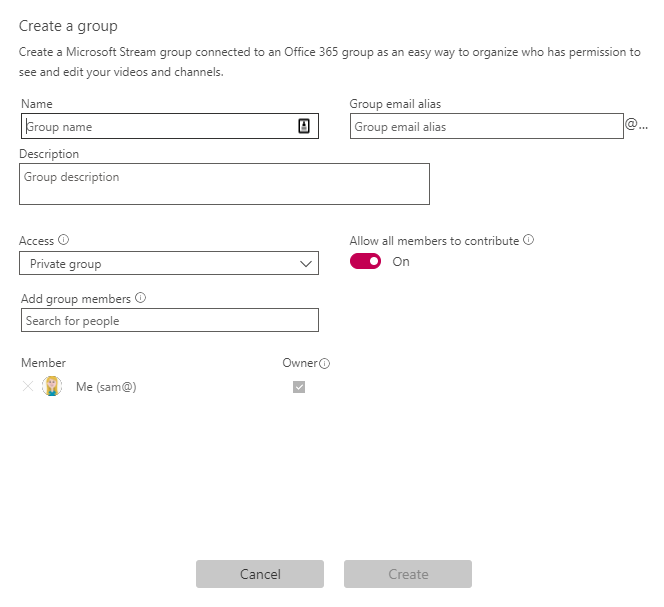
5. Enter a name and description for your group.
6. Choose if you want a private or public group. A private group means that only members of the group (e.g. your class) will be able to see the videos shared to the group. A public group means that the videos will be viewable by everyone in your school.
7. Use the Add group members box to search for your students.
8. Toggle the Allow all members to contribute option on or off, depending on whether you want your students to be able to share videos with the group. For example, you would leave this enabled if you want your students to upload videos as part of a task or assignment.
9. Click Create.
[bctt tweet=”If you’re using #Microsoft #Teams, check out how #Stream can help you easily share videos with your class.” username=”samvardanega”]
Step 3: Access and manage the Group
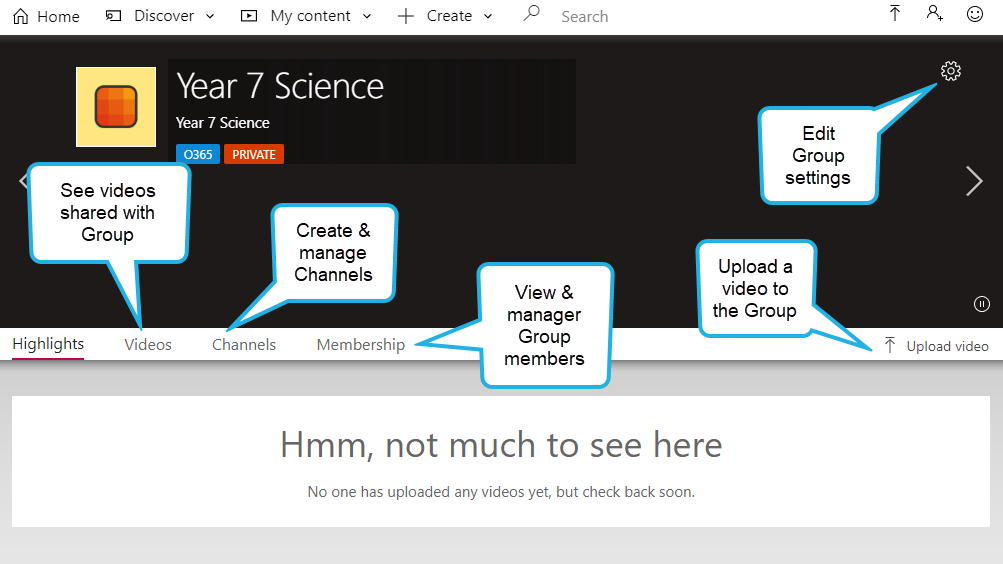
Once you have created a Group, you can view its shared videos, add channels, view and manage members and edit Group settings.
1. Click My content in the top toolbar > Groups.
2. Click on the Group you want to access.
3. The Group will open.
- Click the Videos tab to see videos uploaded to the group.
- Click the Channels tab to add, view and manager channels (more on this in the next section).
- The Membership tab is for viewing and managing Group members.
- You can edit group settings from the Settings (cog) button- including if students are allowed to add their own videos to the group.
- You can upload a video directly to the Group using the Upload video button (more on this in section 5).
Step 4: Create Channels to organise your Group
Channels in Microsoft Stream are used to categorise and organise videos. You may like to create channels for different topics or areas of study, or for specific student projects or tasks. These latter channels would be particularly useful if students are going to upload their own videos, as it would allow you to easily view all their videos in the one place. Follow the steps below to create a channel.
1.Click My content in the top toolbar > Groups.
2.Click on the Group you want to access.
3.Click the Channels tab.
4.Click the New channel button.

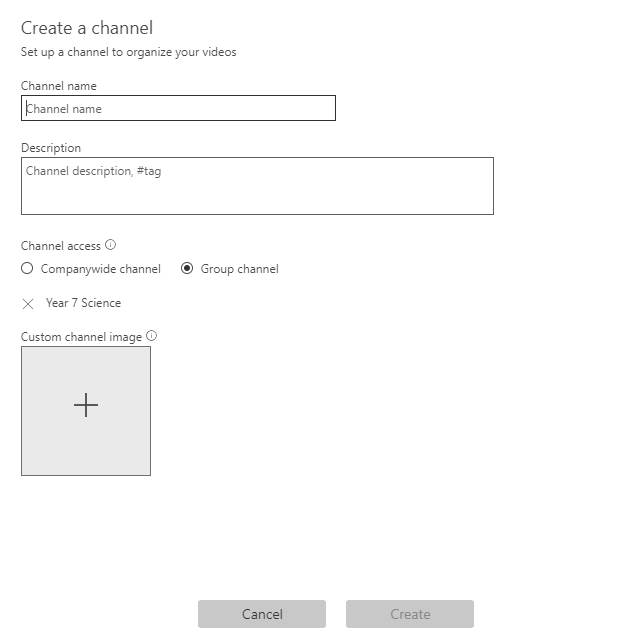
5. Enter a Channel name and Description.
6. Make sure the Group channel option is selected, and the name of your group is listed below.
7. If desired, upload an image to customise your channel.
8. Click Create.
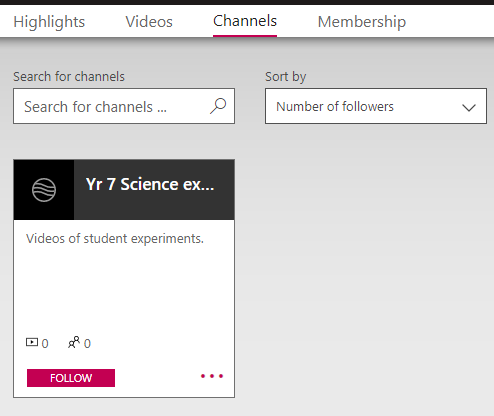
9. The channel will be shown in the Channels tab. Your students will also be able to see this channel.
[bctt tweet=”Use Groups and Channels in #Microsoft #Stream to easily share videos with your class.” username=”samvardanega”]
Step 5: Upload videos to your Group and add them to a channel
Now that your Group and channel are ready to go, it’s time to upload a video! These are the same steps that your students can use to upload videos.
1. Open your Group and click the Upload video button.
2. Browse for the video you want to upload (via Windows Explorer or Mac Finder).
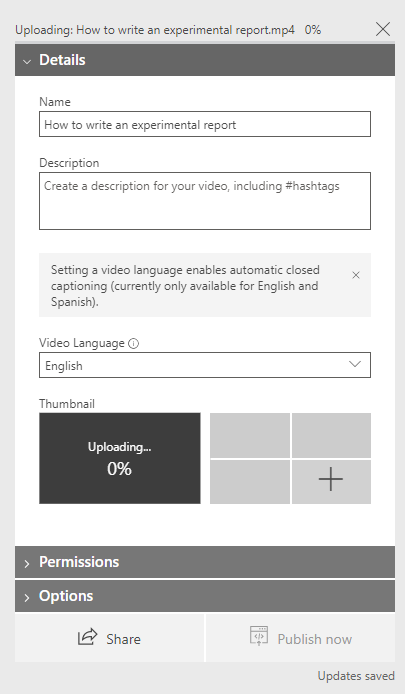
3. The video will begin to upload. In the Details section, edit the name of the video (if required) and add a description. After the upload has finished you can also choose a video thumbnail.
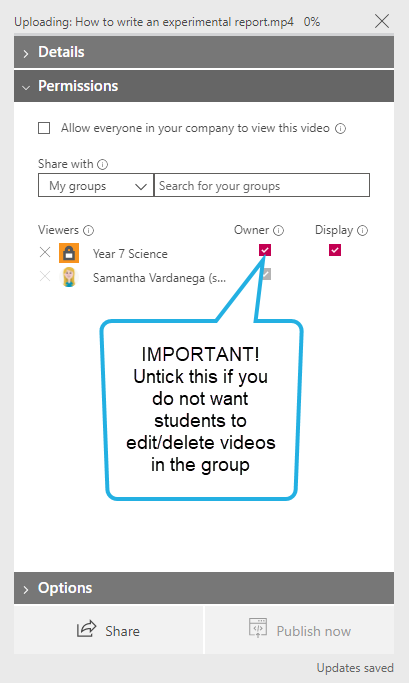
4. Click the Permissions section to expand. Check that the video is being shared with the correct group. IMPORTANT: Untick the owner box next to the group name if you do NOT want other members of the group (e.g. students) to be able to remove or edit the video. You can learn more about video permissions here.
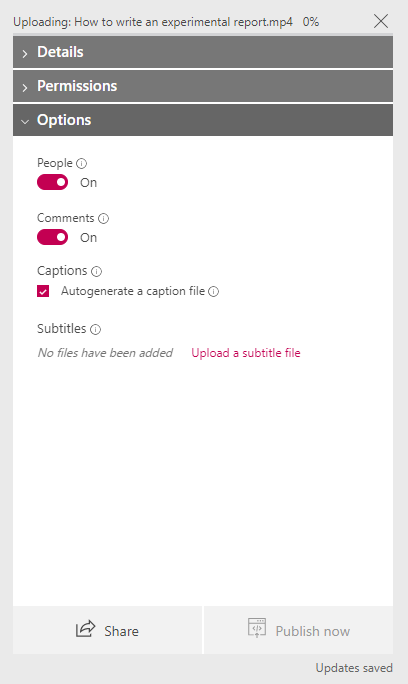
5. Click the Options section to expand. Choose to enable or disable the following settings:
- The people option can automatically find people’s faces in your videos (if this is enabled in your Office 365 environment).
- Comments allows others to comment on videos.
- Captions are a text version of what is spoken in the video. Viewers of the video can use the ‘CC’ button to show captions. This is great for students with hearing difficulties.
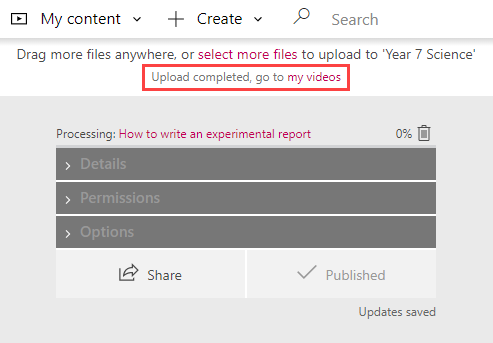
6. Wait for the video to finish uploading, then click Publish now.
Note: After the video has uploaded it will begin processing. This can take a few minutes. After processing is complete your video will be ready to view.
7. Click the ‘my videos’ link to quickly navigate to your video list.
Tip: You can also click My content > Videos in the top menu.
8. Your uploaded video will be shown. Click the Add to group/channel button (shown below) to add the video to a channel.

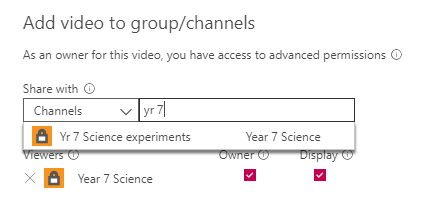
9. Change the Share with box to ‘Channels’ and type in the name of the channel to search for. Select the channel and click Save.
Tip: To save even more time, you can also upload videos directly to channel. To do so, navigate to the channel first and then click the option to Drag more files anywhere, or select more files to upload.

[bctt tweet=”Here’s how students can use #Microsoft #Stream to easily share videos of their work!” username=”samvardanega”]
Learn more about Microsoft Stream
If you want to learn more about Microsoft Stream, here are a list of useful help articles from Microsoft:
Get started with Microsoft Stream
Create a group in Microsoft Stream
Groups and channel settings in Microsoft Stream
Upload a video
Permissions and privacy in Microsoft Stream
FAQ
Want to learn more about Office 365?
Check out our FREE Getting Started with OneDrive online course.


