


Spring is nearly over here in the Southern Hemisphere, so we’re wrapping up our series of posts on doing an Inbox spring clean. In this third post, I’ll show you how to spring clean your inbox in Outlook for Mac (if you’re an Outlook for Windows user, check out this post).
Note: The steps and images shown in this post are for Outlook for Office 365 (Mac desktop version 16.30, November 2019). Some things may look a little different if you are using another version of Outlook, but the general process will remain the same.
Why you should spring clean your Inbox
Let me start by saying that not everyone needs to spring clean their inbox. If you’ve got your emails under control with an effective processing and tracking system in place, you’ll probably have only a small number of emails sitting in your inbox at any one time. However, the majority of people I meet haven’t achieved this state of inbox control yet! If you’ve got hundreds, or thousands, or maybe even tens of thousands of emails in your inbox, it’s time for an Inbox spring clean! Why? Because opening your inbox every day to a huge email count is very likely causing you some level of frustration, anxiety and cognitive overload (even if you don’t realise it). Imagine what it would be like to open your Outlook mail and see all your mail with minimal scrolling…that’s what an Inbox spring clean can help you do.
An Inbox spring clean is also the first step in implementing new efficiency-boosting email management practices. You need to clear the email backlog first, then you can put new systems in place. If you’re keen to learn more about efficiency-boosting email management practices, check out our posts on How to organise your folders in Microsoft Outlook for Mac and How to quickly find an email in Microsoft Outlook for Mac.
How to do an Inbox spring clean
To perform a spring clean in the Outlook inbox, you will need to use the advanced search tool and the Archive button(click on the links if you want to learn more about these features).
Follow these steps to start cleaning!
1. Find out what the oldest email in your inbox is by clicking on the Date Received column heading to sort mail by date. You may need to click it twice to sort oldest-to-newest (which is the little arrow pointing up). Scroll up to the top of the inbox and check the date on the oldest email. Warning, you may get a shock!

2. Decide how you want to spring clean. For example, on a year-by-year basis or everything at once. I strongly recommend year-by-year if you have more than a few thousand emails in your inbox (I have found the process can time out if you try and archive too many at once).
3. Based on your decision in step 2, use the search box to perform an advanced search for emails in your inbox, based on a particular date range (starting with whatever year your oldest email is from). To do this:
- Click into your inbox, the click in the Search box in the top right corner of the screen.Make sure that Current folder is selected in the toolbar. This will limit the search only to your inbox (you don’t want to archive everything in your mail account!).

- Click on the Date Received button in the toolbar and choose After. This will add the ‘Date Received’ search criteria boxes at the top of your inbox.

- Click the little + on the right hand side of the search criteria boxes to add another row of search criteria.
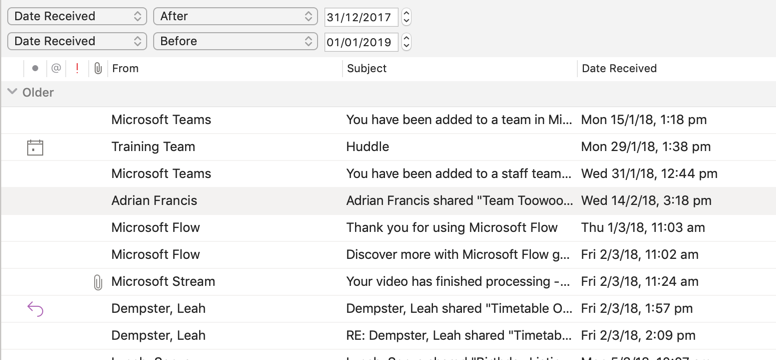
- Expand the Item Contains box and choose ‘Date Received’. Expand the Any Date box and choose ‘Before’. It should now look similar to the image below (however, the dates may be different).

- Change the dates in the boxes to search for the first year of your spring clean. For example, to capture all emails from 2018, I would use the date 31/12/2017 in the first row, and the date 1/1/2019 in the second row.
- The search results will be shown.
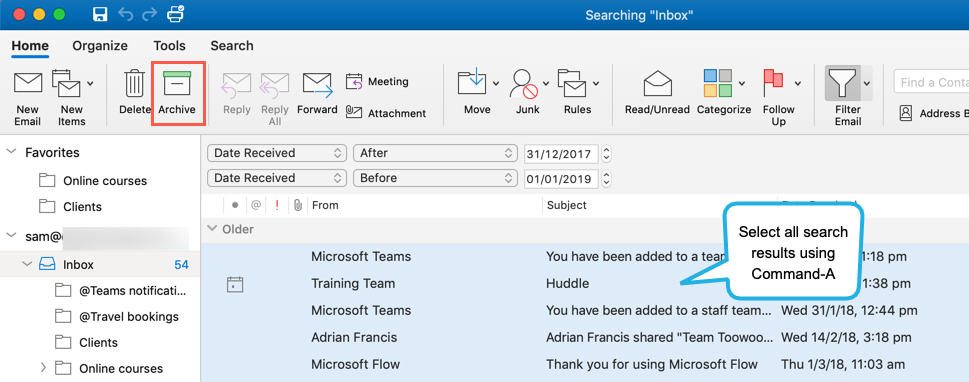
4. Press Command-A on your keyboard to select all of the emails in the search results.
5. Press the Archive button on the Home tab.
Note: If you have never archived an email before, you may be prompted to create an Archive folder at this point.
6. The archiving will now begin. The archiving process can take a while and Outlook may display a ‘Not responding’ message while it is archiving. Just be patient and wait for it to complete!
7. Repeat steps 3-5 for all other years in your inbox. The easiest way to do this is to adjust the year dates in the existing search criteria.
All the emails will now be located in the Archive folder for the email account. This does not take the emails away from your account, they are still accessible anytime you need them. You can easily find these emails using the search feature. Check out this blog post if you need some tips on searching effectively.
Prefer to see an Inbox spring clean in action?
Check out the video below.
Want even more tips for getting your Inbox under control? Contact us to learn more about our email efficiency workshops for Microsoft Outlook.


