


If you use Microsoft Outlook for Mac and want to become efficient at quickly finding emails, then learning how to search effectively is really important! It’s so easy to waste time digging through folders and scrolling through search results trying to find that email that you just know is hidden somewhere. In this blog post, I’ll explain how the search feature works in Outlook for Mac (it’s quite different to how it works in the WIndows version) and how you can use it to quickly find the email you are looking for.
Note: The steps and images shown in this post are for Outlook for Mac (Office 365 version 16.25, July 2019). Some things may look a little different if you are using another version of Outlook for Mac, but the general process will remain the same.If you are a Windows user, check out this blog post on searching in Outlook Windows version.
Search basics
Before we delve into effective search practices in Outlook for Mac, let’s start by covering some fundamental concepts.
The search box
You can perform a basic search in Outlook by simply typing a keyword in the Search box. Clicking in the search box will also open the search toolbar in the ribbon.

By default, this will search the current folder or view only (i.e. wherever you currently are, like your Inbox ) and will look for the keyword in:
- The to, from, CC and BCC fields
- The email subject
- The email body text
- The file names of attachments (but not the contents within the attachments).
Expanding the search to other locations
Most of the time you will probably want to search your entire mailbox, not just one location. This is a setting that you will need to change each time you search. Use the icons in the Search toolbar to choose a location to search.

- Current folder: Searches only in the folder you are currently in. This is the default option when you perform a search.
- Subfolders: Searches in the folder you are currently in and all its sub-folders.
- Current Mailbox – Searches in the Inbox, Drafts and the folders and sub-folders of whichever email account you are in when you perform the search.
- All Mail: Searches in the Inbox, Sent, Drafts and the folders and sub-folders of all email accounts you have open in Outlook.
- All items: Searches all Outlook mail accounts, calendars, contacts and tasks.
[bctt tweet=”Do you know the fundamental concepts of #Microsoft #Outlook search on a #Mac?” username=”samvardanega”]
Using advanced search features for a more effective search
While it might seem quick to type a keyword in the search box, this can return a lot of search results! You then have to spend time scrolling through the results trying to find the email you want. Or worse, the email you are looking for is not even in the search results! By taking the time to use the advanced search features in Outlook for Mac, you can narrow down your search results so that you can quickly pinpoint the exact email you are looking for.
The search toolbar
As mentioned above, clicking inside the search box will automatically display the Search toolbar in the ribbon. It will also display a pop-up list of recent searches that you may like to reuse.
All of the buttons on the Search toolbar can be used to fine tune your search. Clicking on a button will add an advanced search box just below the ribbon.

Clicking on a second button will add another advanced search box. You can also add or remove advanced search boxes by clicking the + and – buttons on the far right.

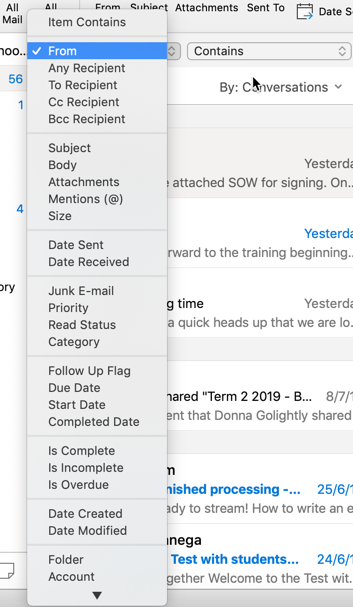
You can also change the advanced search field used in these boxes by clicking on them and choosing a new search field from the menu. You’ll notice that there are more advanced search options available here than in the ribbon.
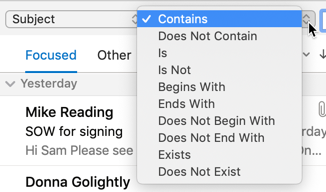
The Contains box also has a drop down menu that you can use to specify how you want to keyword to be matched during the search.
Tip: The ‘Contains’ option will find emails that contain the keyword(s) (even if it is amongst other words, such as in the email subject). The ‘Is’ option will find emails that only have the keyword(s), such as an exact match to an email subject.
When you have finished searching, click the Close Search button to clear the search results and close the search toolbar.

Example – finding an email from a specific person
Using the From button when searching is the quickest way to find an email that someone has sent you. Searching without this option will show all emails to and from that person (including CC’s and BCC’s) and all emails that mention the person’s name, but searching with this option will only show emails they sent you. This is much more effective!
To use the From button in your search:
1. Click in the Search box to activate the search toolbar.
2. Click the From button.
3. To choose the sender you want to search for, click in the text box on the right and type their name or email address.
Tip: For the best results, enter their full email address. Otherwise you may get results from other people with the same name.
4. The search results will be displayed.
Other advanced search options
Other useful buttons on the search toolbar include:
- Subject: Only returns search results where the keyword is in the subject of an email.
- Attachment: Only returns search results that have an attachment, or only search results where the attachment is greater than the specified size.
- Sent To: Can be used to find emails sent directly to you or CC’d to you, not sent directly to you (e.g. sent to a mailing list) or emails sent to a specific person (another recipient). You could use this last option to find emails you have sent to a specific person.
- Date Received: Only returns search results received during the chosen time (Today, This week, This month or after a specific date).
- Date Sent: Only returns search results sent during the chosen time (Today, This week, This month or after a specific date).
- Important: Only returns search results where the email has been marked as important.
- Unread: Displays all your unread items.
- Flagged: Only returns search results where the email has been flagged. You can then choose which flag to search for.
- Categories: Only returns search results where the email has been assigned a specific category. You can then choose which category to search for.
- Advanced: Adds another search box which you can then use to select one of the many other advanced search options.
The great thing about these advanced search operators is that you can combine multiple ones in one search. For example, you could search for all emails from a specific person that were received this month and that had an attachment. Simply clicking all the relevant search buttons on the toolbar to add the search fields. With this kind of search you are far more likely to quickly find the email you are looking for.
[bctt tweet=”The #Microsoft #Outlook for #Mac search toolbar has heaps of options to help you search more effectively!” username=”samvardanega”]
Save time by saving your frequent searches
One final time saving tip for searching Outlook effectively is to make use of the Save Search button on the toolbar. This will save your search in the Smart Folders section of Outlook. Smart Folders are virtual folders that dynamically display search results for a saved search.
To save and re-use a search:
1. Perform the search using the steps outlined in the rest of this post.
2. Click the Save Search button on the Search toolbar.
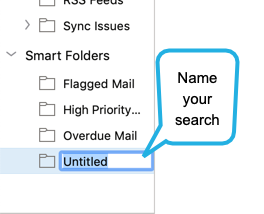
3. Locate the new ‘Untitled’ folder that appears in the Smart Folders section of Outlook (bottom left hand side). Enter a name for the search and press Enter.
4. The search will be saved as one of your Smart Folders. You can now click on it at any time to instantly see the emails associated with the search.
5. To edit or delete the Smart Folder, right click on it and choose the edit or delete option.
[bctt tweet=”The Save Search tool in #Microsoft #Outlook for #Mac is a great way to quickly re-use a search without having to enter the criteria again!” username=”samvardanega”]
Once you have put these Outlook for Mac search strategies into practice, you’ll notice that you will spend less time trying to find emails and more time actually actioning them!
Interested in getting more efficient with Microsoft Office 365 tools?
Contact us to find out more about our face-to-face and online training options for your organisation.
Prefer to see these search tips in action?
Check out our video below.


