


Using Immersive Reader to help students support themselves
All teachers want to support the students in their class to be the best they can
be… it is why we choose to teach! What if we can empower our students to
support themselves? With Immersive Reader we can!
As teachers, we are always looking for ways to support our students and make their learning experiences more accessible and effective. One tool that which is gold in this regard is Immersive Reader, which is available
across Microsoft 365. In this post, I will explain how to use the Immersive Reader in M365 and share some tips for how you can use it to support
your students’ reading and comprehension skills.
What is Immersive Reader?
Immersive Reader is a tool that can help students read and comprehend text more effectively. It was originally designed to support
students with dyslexia, but it has developed way beyond just that. The tool offers a range of features that can make reading easier, such as
text-to-speech, spacing adjustments, line focus, picture dictionaries, and translation.
How to Use Immersive Reader in M365 (Note: you can get Immersive Reader for Websites as a Chrome extension too).
Step 1: Open a Document/Webpage
To use the Immersive Reader, you first need to open a document in one of the Microsoft 365 apps. This could be a Word document, a OneNote page, or a webpage in Edge. For full availability, check out this document.
Step 2: Open Immersive Reader
Once you have opened the document, select the text that you want to read using Immersive Reader. Click on the View tab in the ribbon and
select Immersive Reader.

You can also use the Search bar at the top to locate it.
Step 3: Customize Your Reading Experience and Playback
Once Immersive Reader is open, you can customize the reading experience for your students. You can choose to have the text read aloud by clicking on the Play button.

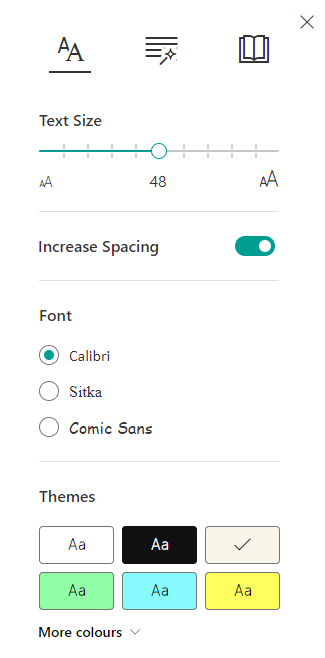
Click the Text Preferences icon in the top right. You can adjust the font size, font style, line spacing, and text colour to make the text easier to read.
Step 4: Use the Picture Dictionary
If your students come across a word they don’t understand, they can use the picture dictionary feature to help them. They simply need to click on
the word, and a picture will appear to help them understand the meaning. The example below shows Rainforest.

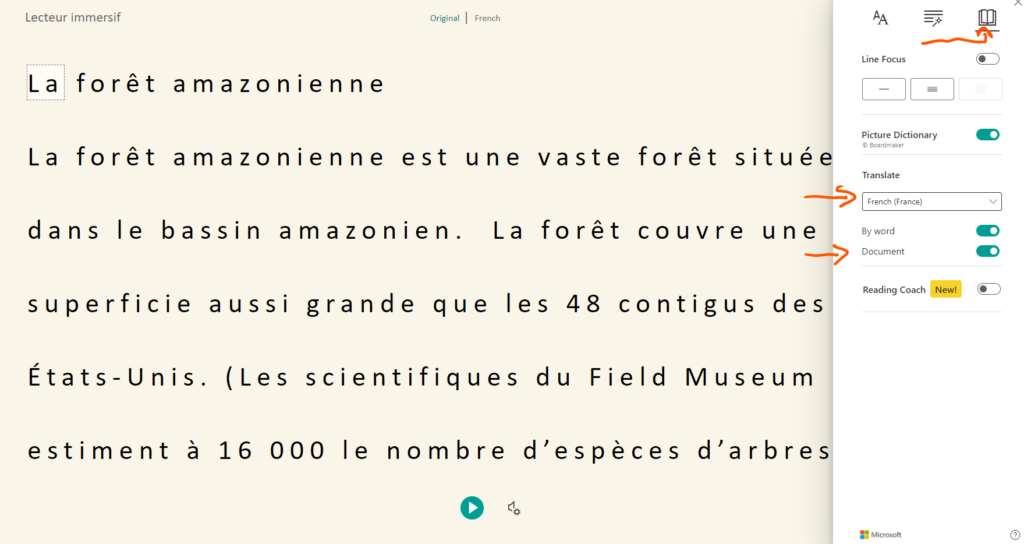
Step 5: Translate the Text
This is my personal favourite! If you have students who are not fluent in the language of the text, you can use the translation feature to translate the text into their preferred language.
Select Reading Preferences from the top right corner and then choose language (French below but there are hundreds you can choose from)
you want to translate to from the dropdown menu. Toggle the Document
switch on and voila!
Here are a few suggestions for how you can use Immersive Reader in
your classroom:
● Use Playback/Read Aloud with challenging texts to make them more accessible to all students. This can also be used to help students spot errors in their writing that they can hear but may not be able to see.
● Empower students to use the picture dictionary feature to develop their vocabulary skills and deepen their understanding of the text.
● Use the translation feature to support English language learners and students who speak languages other than English at home.
My passion is to make learning accessible to all and Immersive Reader is
a valuable tool for supporting your students’ reading and comprehension
skills.
See how your skills stack up by completing our Microsoft Skills Checklist.
Sign up for our Learn on Demand package where you can access regularly updated materials on Microsoft, Google, Apple and AI tools.


