


[podcast]
A demonstration of the new user interface for Teacher Dashboard by Hapara.
VIDEO HIGHLIGHTS:
0:00:48 How to access the new user interface in Teacher Dashboard
0:00:59 Features of the new user interface in Teacher Dashboard
0:01:53 Grouping students with the new user interfaces Teacher Dashboard
0:02:24 Setting up groups
0:02:42 Accessing student’s accounts
0:03:29 Teacher Dashboard Smart Copy feature
0:04:09 How to easily send or sharing documents to a class or student
TRANSCRIPT:
Hi, Mike Reading here from www.usingtechnologybetter.com. This short video is just a video I’ve created for our teacher dashboard customers who are looking at the new user interface and wondering what’s changed and how things are functioning a little bit differently.
If you don’t have a teacher dashboard account for your school, we can set you up with a demonstration and show you the features and the benefits of using teacher dashboard with your students and we can set you up with a free trial of your account at your school to see if it might be a good fit for you in the way that you operate.
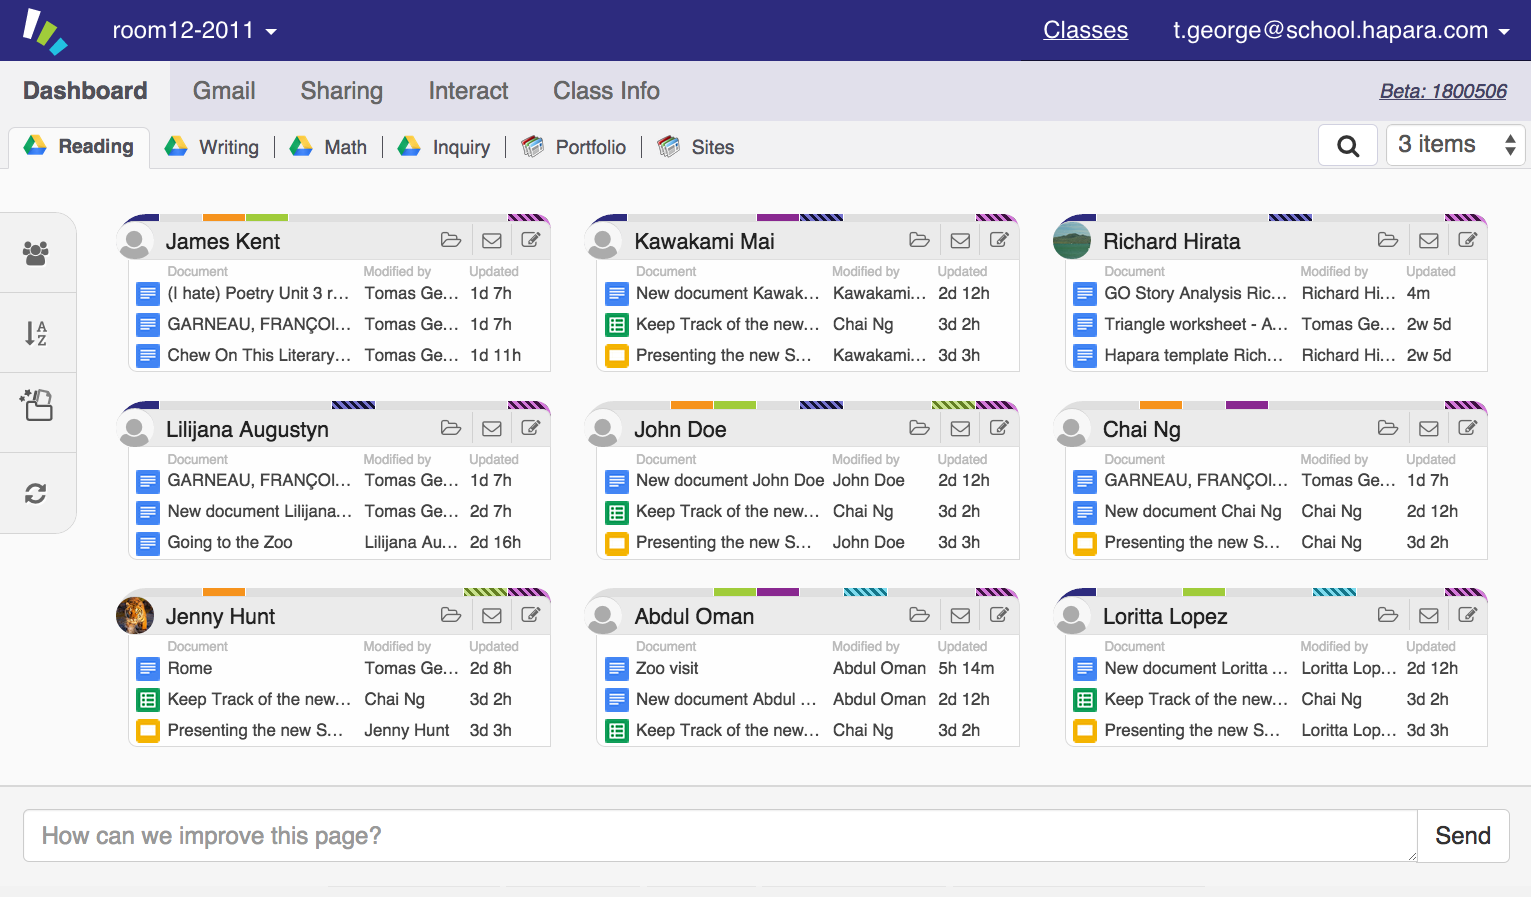
For those of you that have been using teacher dashboard before, this is the old interface and you’ll know that if you click on the class you’re about to teach or your students there, and we have some options across the top. To access the new user interface, what you can you do is just go to www.teacherdashboard.com, it will find your credentials and then re-launch in this new user interface just here.
Now this new user interface for teacher dashboard is in Beta mode so it’s still being worked on in the background but you can always flick back to the old version if you need to. So apart from the look that is different, there are a couple of functional differences so if we open up one of our classes just here, you’ll notice that all the same functionality is retained, you’re able to see your students work inside their class folders, all your students on the one screen.
You’re able to see their Gmail, you’re able to see all of their drive accounts, including their shared and their unshared accounts. We still have interact feature where we’re able to see what’s going on, on the student’s computers, we can see all their tabs that are open and we can send messages to students. We can open up tabs and we can take screenshots, which is great for digital portfolios.
All of the functionalities are still retained but a few little differences along the way. If we go back to our Dashboard view just here, if you wanted to add your students to a group, you’ll notice that the group’s option has disappeared from here.
So what you need to do is click this little edit icon or the pencil just here and you can put your students into a group. Now one of the great additions to the group feature in teacher dashboard is that you can now add your students to several groups at the same time, which is really handy.
Now to set up what your groups actually mean, all you need to do is click on the groups button just here on the left hand side of your screen and you can change the names of each of those groups just there and you can say which ones do you want to see and not see just the way that we always used to be able to do it. When we’re looking at our student’s accounts and seeing what the students have accessed in their dashboard then one of the options that we have here is to be able to refresh the data that is inside that feed.
Now you don’t need to go and refresh your whole page, what you can do is just click the refresh button just here, you’ll see the little pencil, the little icon swirls and we have our documents here. Still, you have the same functionality, just hover over a document to see what the student has done and you can see some of the statistics there in the box. If you want to open that document to leave a comment, to mark the document and so on then just simply click the link, a new tab will open and you’re able to access that student’s document right there.
In terms of the smart copy feature, which is a feature that a lot of teachers love, this has had a bit of an overhaul and if we click on the smart share just here then you’ll see that the layout is a little bit different. You might notice that you can now select up to five files to send all at one time. Now just a reminder, these are not just Google documents, this will work with any document that you want to push. So you can select your documents from here. So let’s just say we select one from our drive account and the whole system is a whole lot more streamlined. So you can see that you’ve got some extra options across the top here in like a tool bar fashion.
[bctt tweet=”You can now share 5 documents at a time with the new teacher Dashboard User Interface. Find out… “]
You can choose the document that you want to share and you can send it to all the classes here or you can send it to your students.
So if you click on students, we get the option to choose which students we want to send to and if we choose groups like we used to, you can say “Hey I just want to send this document to this particular group of students” which is a really handy feature. Now in here let’s just say we want to send it to those two students, down at the bottom, we have the option to overwrite documents that already exist with the same title so that functionality is retained and then we just simply click okay on that and then teacher dashboard will package up that document and it will start to run in the background.
Now you’ll notice that there’s not popup that comes up on the screen now telling you what’s happened, this is here on the center of your screen down at the bottom where it says “Smart Share Service” and it’s starting to run that process. Now you don’t need to have that open the whole time, it’s taking up screen real estate, just simply click the close button and that will just remove that to the background.
So some fantastic features in the new user interface, the smart share is a whole lot quicker and a whole lot more stable than it used to be and so teachers are really loving this new interface here. If you’d like to see how you can use teacher dashboard and Google Classroom together, that’s one of the most often requested features that come through on our help desk, then we have some videos on our blog www.usingtechnologybetter.com and you can go and watch those.
If you’re an existing user and you have a question, then just log your question through the help desk and one of the team will help. If you would like a trial of teacher dashboard at your school with all your school data in it, so it’s a true trial, then just simply send an email to the email address just below this video [aileen at usingtechnologybetter.com] or simply fill out this form and one of the team will contact you shortly and we’ll get your account set up for you.
So thanks for watching this video and we’ll see you in the next one.


