


4 steps to getting your 2023 Class Team set up in the blink of an eye
The end of the school year is looming and you are keenly aware that you don’t want to spend your summer holidays setting up for the new school year. We’ve all been there so follow these 4 steps to get your Microsoft Class Team set up and ready to go so that you can wow your students with your efficiency and take back that well-earned beach time.
There are a few reasons why we won’t create your new Class Team by just removing the current students and adding the main ones. Namely, security. The current Team will be populated with Assignments, Insights, and other data that is linked to the existing students. Instead we will archive this existing Team and create a blank slate for your new learners using the following method.
Step 1: Tidy up your existing Class Team
First, do a bit of an audit. What can you spring clean? Don’t worry about discussion space as we will be leaving this in the dust. The focus here should be on the following spaces:
Channels: Naming conventions are king. Our advice to teachers here is to use the channel structure to separate out areas for learning. You might want to revisit this blog post How to make your Class Team a one-stop shop that does a bit of a deep dive on this topic. Top tip: Use emojis at the beginning of the channel name to make them stand out.
Tabs: We can carry these over to your new team so double check that you want everything – if not, you know what to do, right-click and remove.
Files: Make sure these are organised in a way that makes sense for your students when they are trying to locate things. Maybe it’s by strand, maybe by term – whatever it is, make it logical for all users.
Step 2: Create your new Class Team
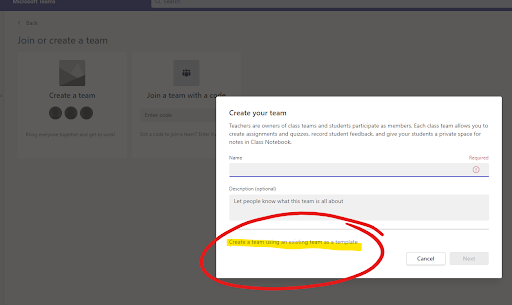
This is where the magic happens. When you click to create a new team, select ‘Class’ and then the option ‘Create a new team from a template’. You’ll then have the option to choose what you take over – tabs, apps, channels, and members. Click what you need and hey presto – new team! A reminder here, naming conventions are important. Make sure you have decided as a school what this is, at a minimum every Class Team name should include the year.
Note: You cannot have two teams with the same name
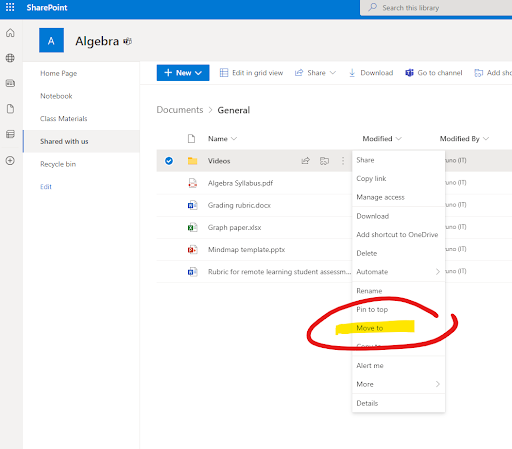
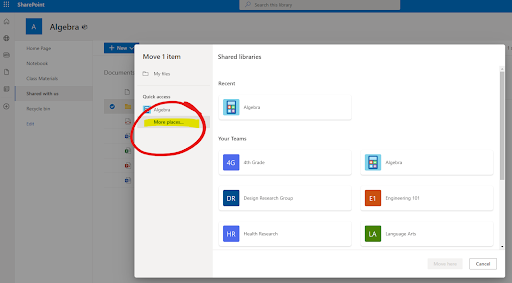
Step 3: Move the files over from SharePoint
Open up and locate the old class in SharePoint, move over the files by clicking the three dots next to items ➡️ move to ➡️ selecting your new team channel location. You may have to click on ‘More places…’ to see your new Class Team. Note: only carry over what you need, you can always bring more over later so keep it simple so as not to overwhelm students.
Step 4: Add Co-Teachers and Students
There are a few ways to tackle this step and I’ll rank them by order of ease.
- Have your IT manager import members of the team using an automated process that pulls class lists from your learning management system. If using this approach and you are a high school, wait until a few weeks into term when the class roll is finalised to avoid backtracking when there are inevitable changes to come.
- You can add the members manually yourself in the ‘Manage Team’ option or during creation. As you type, the members will auto-populate from the Azure Active Directory, your school’s database of students and staff.
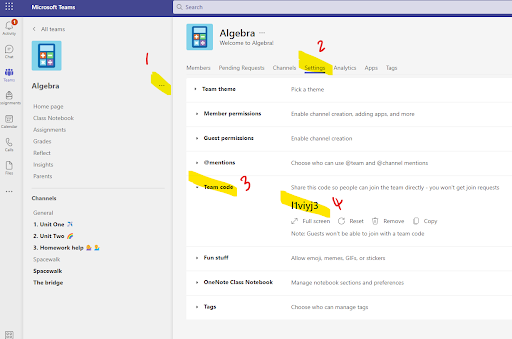
Provide members with the ‘join code’. This is my preferred and easiest option. To generate this head to your team settings and scroll down to join code. Screenshare and students join when they are sitting in front of you. Easy.
Voila – your new Class Team is ready to roll!


