


Google Slides is one of the most versatile apps in the G Suite suitcase and can be used very effectively to provide more student agency within your classroom. The ability to link within slide decks or out to other files can add another level of functionality for both the teacher and the student.
This is part one of a three part series in ways you can use Google Slides to develop independence and student agency in your classroom.
The first thing to consider, however, is the organisation of your Drive. I know this post is about Google Slides, but I often see teachers, and students for that matter, going to slides.google.com and creating a new slide deck from there. The only problem with that is the slide deck will then be created in the home page of your My Drive. If you want to file it, you then have to move it later by either clicking on the grey file box image at the top of the slide or by doing a few clicks from within your Drive – once you find it again. I find it much better to go into the Google Drive folder I want the slide to be in and create it from there. You can still access any templates you want by clicking on the ‘New’, then ‘From a Template’ option. By creating the slide here I can go back to it more quickly as I know exactly where it is and my Drive is much more organised.
[bctt tweet=”Create new #Google #Slides in folders to keep your #Drive organised.” username=”donnagolightly1″]
So once we have considered the organisation of our Slides, how can we use the tool to encourage more student agency within our classrooms? One of the beauties of Google Slides is the ability to insert links and embed content. Here is the first of three ideas around ways to utilise the offerings of Slides to develop resources to encourage student choice and independence.
Part One: Create a playlist of videos
One of the common worries that I often hear from teachers is around their reluctance to use YouTube as a learning tool. When you provide a link to a YouTube video, you can’t actually be assured that your students will only watch the video you want them to and not get lost amongst the temptations of the surrounding videos or ads that are also there. There are sites like viewpure or tube that allow you to paste a link in and then watch it uncluttered… but you could also use Google Slides to make your own class playlist that you then have as an ongoing resource the students can independently revisit.
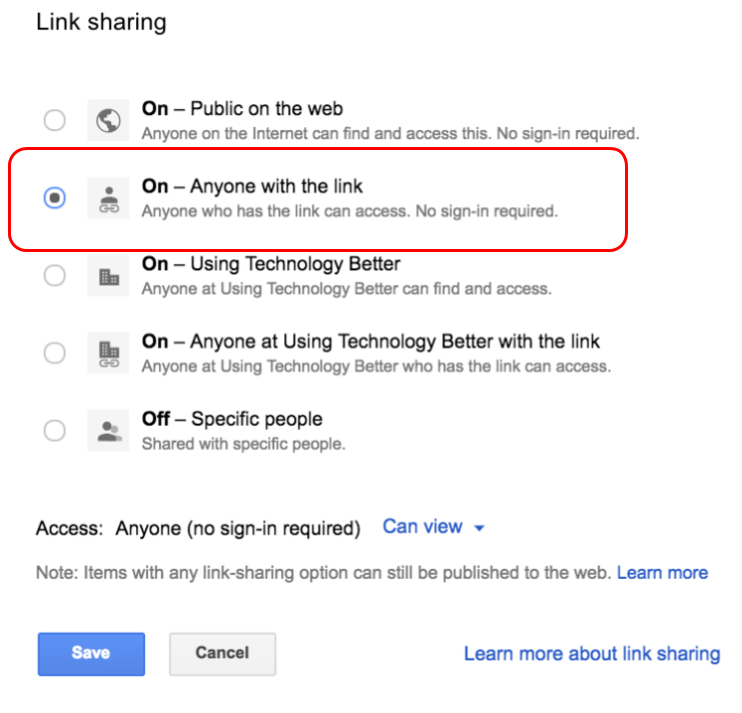
In my classroom I had a Google Drive folder that I put resources in that were intended for sharing with students. I made sure the sharing settings on that folder were set to ‘Anyone with the link can view’. Anything that I created in that folder had the same sharing settings – so I didn’t need to think about changing the settings every time I created something new. Inside that folder was a slide simply called ‘Videos’
[bctt tweet=” Create #Google #Slides for sharing in folders that already have sharing permissions set.” username=”donnagolightly1″]
Any videos I wanted the students to watch, or videos they suggested we add, were hosted on the slide deck. I could also control whether they watched all of the video or just the relevant parts. If I wanted them to just listen, and not see the images (especially with music videos we used to listen to during art afternoons), I could minimise them so they could still hear the video, but not be distracted by the images.
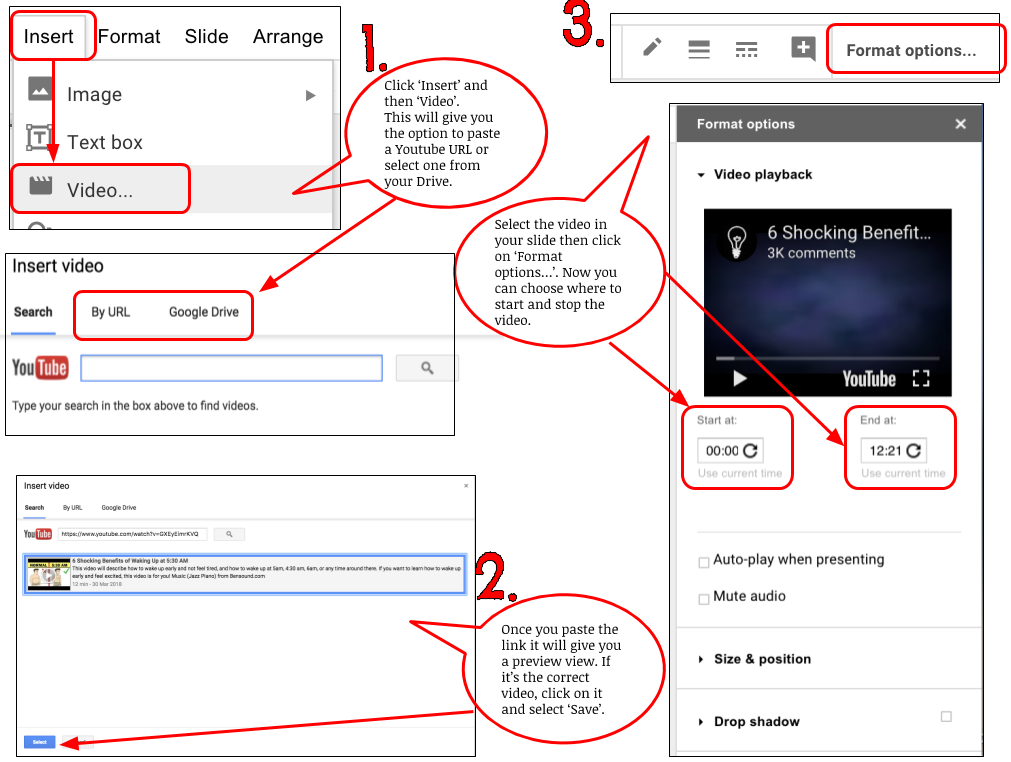
[bctt tweet=”When you embed a video in #Google #Slides you can change the start and end points. ” username=”donnagolightly1″]
To learn how to minimise the video so you can only hear it, but not see it, check out Lara’s blog here on Adding Audio to Google Slides.
You can create playlists within slides for different topics or different subject areas. It’s useful to have them as a resource you can revisit also without having to go back to YouTube and find them again.
Your students are then able to use these slides as often as they need, independently of the teacher while they continue to develop agency in their own learning.
[bctt tweet=”Use #Google #Slides to create playlist of videos for students to use” username=”donnagolightly1″]
So there we are, the first of three ways to get you started with Google Slides and increasing student agency in your classroom. Part two and part three will be published shortly.
Give it a go and think about how you could leverage this idea to empower your students in their learning. We’d love to hear what you’re doing in your classrooms.
For more ideas check out our blog pages here.


