


One of the features I’ve always liked in G Suite has been the ability to go back and see all the changes that have been made to a Google Doc, Slide or Sheet. It’s also very useful being able to see who made those changes.
It’s been a great tool when students have had that moment of panic and accused their classmate of deleting all their work, or when a group member has made a silly addition to a shared task, deleted it, then denied all knowledge of having ever done it. As we often tell our students, “Once you put something on the internet, it’s there forever.” Being able to show them this in Google Docs is a fantastic way of reinforcing the message.
In both of the incidents above, being able to make a couple of clicks on ‘All changes saved in Drive’ has solved the problem and been immensely helpful.
Clicking on this link opens a dialogue tab on the right hand side that shows every change made to the file, who made it and the time the change was made.

Recently the name of the tab changed from the ‘Revision History’ to ‘Version History’. Along with the name change came a few new additions.
Now you can create named versions of a file to easily switch between different moments in the creation of the Doc, Slide or Sheet.
This can be particularly useful when your students are working on a specific task.
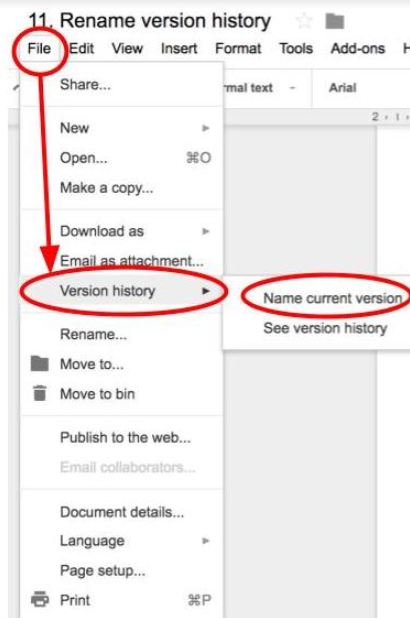
For example, students may be drafting an explanation on what happens when a volcano erupts. Once they have finished their first draft they click on ‘File’ and select ‘Version History’ then ‘Name current version’.
They might name this version ‘First draft’. They know the version has been named successfully because they get a notification in the bottom left-hand corner:

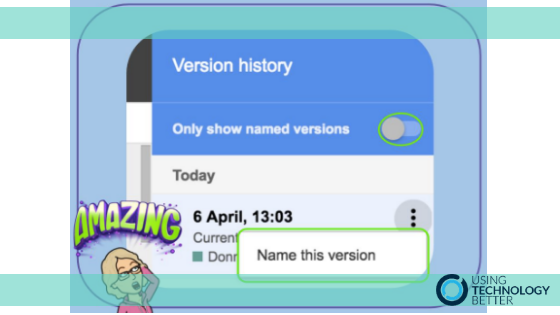
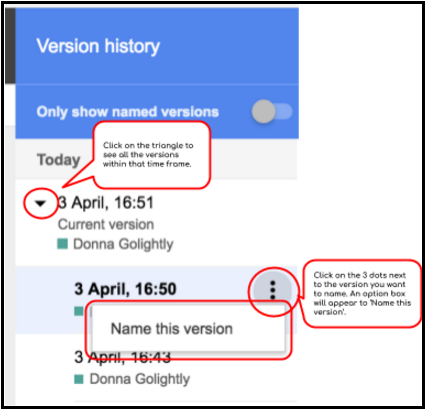
The other way to name a version, although it’s not quite so straight forward for your students, is to select ‘All changes saved in Drive’ then name the version from there:
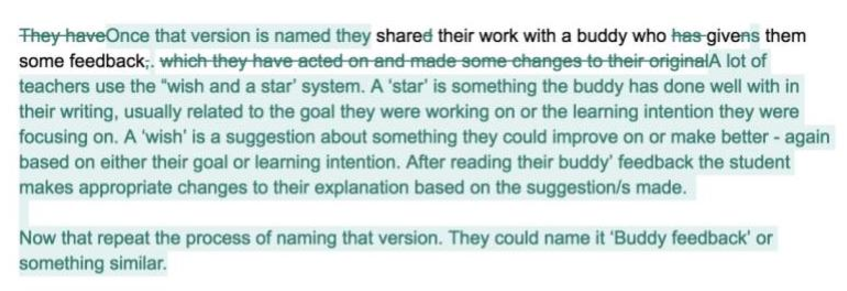
Once a first version is named your students could share their work with a buddy for feedback. A lot of teachers use the ’wish and a star’ system for this.
A ‘star’ is something the buddy has done well within their writing, usually related to the goal they were working on or the learning intention they were focusing on.
A ‘wish’ is a suggestion about something they could improve on or make better – again based on either their goal or learning intention.
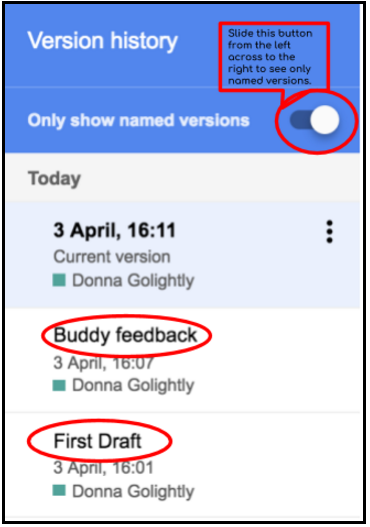
After reading their buddy’s feedback the student would make appropriate changes to their explanation, based on the suggestion/s made and then they would repeat the process of naming that version. They could name it ‘Buddy feedback’ or something similar.
At this stage they would be ready to share their draft with the teacher. Because they have named two versions of their work so far the teacher is able to easily see what changes they made, based on their buddy’s feedback. They would click on ‘All changes saved in Drive’ to open the dialogue box and toggle the slider across to see named versions only:
They can select the version they want to read then click on ‘Restore This Version’. Multiple versions can be read by following the same process.

The editing that has been made since the previous version is highlighted like in the example below:
You don’t have to read back through the whole task – you have a quick visual way to find the changes that were made. How useful is that!
When the teacher is ready to give the student their feedback they would return to the current version. They might conference with the student or leave comments using the comments feature.
When the student has acted on the teacher’s feedback and made any changes necessary they would name the finished version ‘Final Version’. Again, you would be able to easily see the editing and proofreading that took place.
What a useful addition to the writing process this tool is. By being able to name versions it creates a really easy process for teachers and students alike to be able to identify specific drafts of a task and to be able to clearly see the changes made.
There are many other ways you could use named versions of your documents. It allows you to keep a track of changes more efficiently and be in control of how the eventual outcome of the task looks.
Try using named versions in your class programme, they’re easy to do and super helpful.
For more tips and trick on how to be efficient with G Suite tools you might like to take one of our courses here.


