


There has been much research conducted around the effect of the feedback we give to students. We know it needs to focus on the learning intentions and it needs to be purposeful. But I also know that unless I made the feedback relevant and easy for my students to access, much of it would go unnoticed. When I started using digital stickers, some of them designed by the students themselves, feedback started to become more fun – and more of my students started taking notice of it. Using Google Keep to store these stickers allowed me to have a quick and easy way of awarding them. Here’s how I did it…
Step One: Create custom made stickers
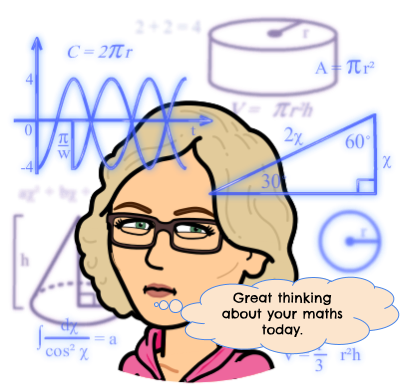 The first step is to create your stickers. These can be literally anything you want them to be. Because I wanted mine to be more personalised for my students I used Bitmoji to create them. Just be mindful with this site that there are a few images that are not appropriate for school.
Once I had created my avatar and was happy with the way it looked, I selected a few that I wanted to work with. If the words weren’t exactly what I wanted, but I liked the image, I copied it, pasted it into a Google Drawing and made the changes I wanted. I then downloaded it as a png file as this gave me a transparent background.
[bctt tweet=”Use Bitmoji to personalise feedback to students.” username=”donnagolightly1″]
Remember, if you are using a Google Drawing to make your stickers, you need to drag the outline of the canvas around your work so that it fits snuggly before you download it.
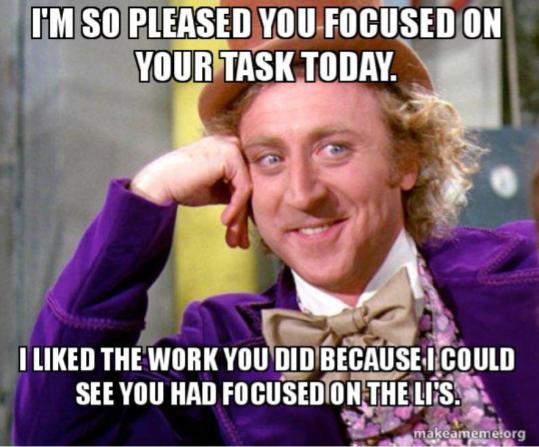
The type of stickers you can create is only limited by your imagination. I’ve seen some teachers who have used a meme creating site to make some that their students have absolutely loved.
Customising your stickers to the interests of the students is important as this shows them that you, as their teacher, have taken the time to create unique and special rewards systems especially for them.
For the artistic and creative teachers among us, Canva is a fantastic site for designing stickers by combining different elements into your own unique arrangements. The Noun Project is now an add-on in Google Slides. It’s also available in Powerpoint. There are 100 different icons you can use either on their own or combined together. Google Slides will let you add shadows and reflection in colour, but you can’t alter the colour of the icon. In Powerpoint you can recolour the shapes themselves.
[bctt tweet=”Create your own stickers using Noun Project icons in Powerpoint.” username=”donnagolightly1″]
Step Two: Add your stickers to Google Keep
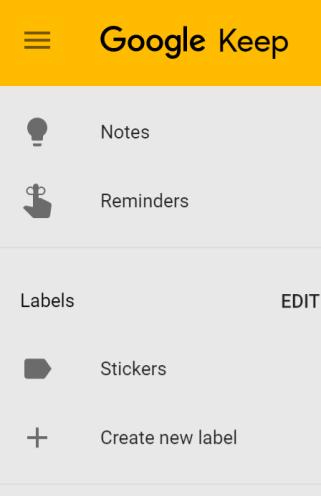
Now that you’ve got a few stickers you want to use, head over to Google Keep. It’s part of your Google Drive. If you can’t find it, tap the nine dots in the top right hand corner where the apps are launched from. Click on ‘MORE’ and you will find Google Keep there.
Open it up and you will see the home page. Down the left hand side you will see the navigation tools. You want to create a label so that you can access all your stickers easily from the one place.
Click on “Create new label” and give it a name. You can see I just called mine “Stickers”.
To open up your label you simply click on it. Now you have the option to create a new note:
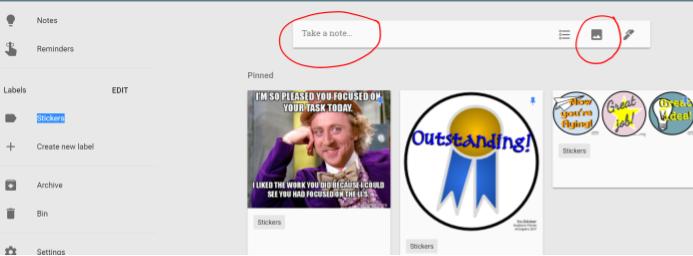
You want to click on the image icon because you are going to insert the .png files that you have saved. Simply upload your image from wherever you saved it to. You can see in the screenshot above that each image is tagged with the label ‘Stickers’.
Step Three: Easily give your students feedback with your custom made stickers
Now comes the best part. When you are reflecting on the work your students have done in Google Docs or Google Slides you go to ‘Tools’ and choose ‘Keep Notepad’.
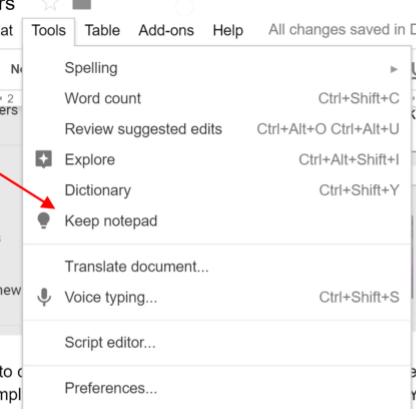
This opens up Google Keep right next to the Doc you are on.
To add your sticker to the student’s work, choose the one you want and drag it across. You
 can then resize it if you need to and click ‘wrap text’ if you want it to sit somewhere in particular. Any stickers that you use on a more regular basis you can pin in Google Keep and these will sit at the top of the feed.
[bctt tweet=”Google Keep opens up right in your browser alongside Google Docs and Slides.” username=”donnagolightly1″]

I also had my students design some stickers at the beginning of the year. We talked about what would make an appropriate sticker and what wouldn’t. The message their sticker portrayed was important and lots of critical thinking happened around this.
Most importantly – they actually looked forward to checking their work and giving feedback became more manageable. Give it a go! It’s a simple way to add custom stickers to your student’s work.
Want to know some more quick tips and tricks about classroom life? Join our online professional learning community


