


Do you often wish that you could create a visually appealing task for your students or a newsletter that is going to hook your parents in with its awesome layout and instant appeal, but design is just not your forte? Well, now you can with Adobe Spark tools. They’re SO easy to use and they allow you to create amazing presentations in next to no time – all for free.
[bctt tweet=”Use Adobe Spark tools to present visually appealing tasks in next to no time.” username=”donnagolightly1″]
Adobe Spark has three different sets of tools available for you to use: Adobe Post, Adobe Video and Adobe Page. They are all free and are now available for all school students to use, regardless of their age. (Previously students had to be over the age of 13 to access them.)
Adobe Post is designed to allow you to create dynamic, visually appealing posters and infographics.
Adobe Video is what its name suggests, a video editing tool that allows you to add images, video, music and your own voice to create an awesome presentation in just minutes.
Adobe Page allows you to create a website-type presentation with multiple forms of content.
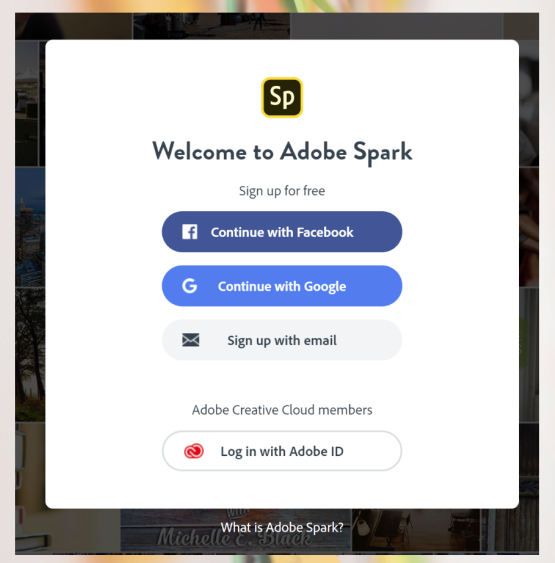
To begin your first project with these fabulous tools, head to adobe.spark.com. If you have an existing Adobe ID login with that, or if you haven’t been there before you’ll need to create a new account. You can sign up with an existing social media account or use an email account.
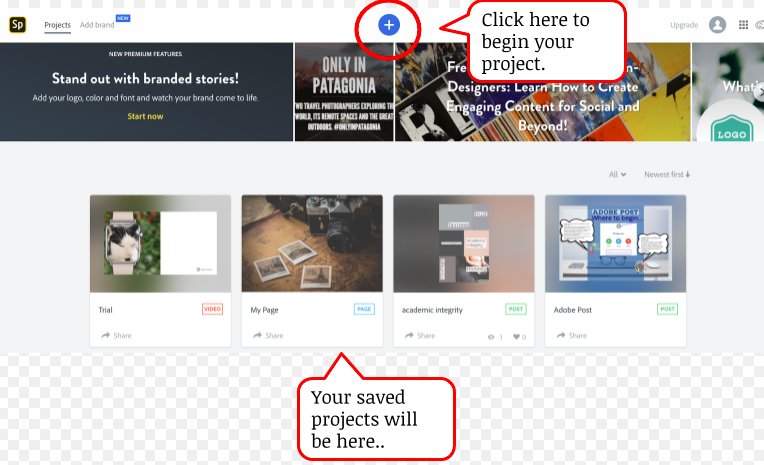
If you are wanting your students to use Spark to present their thinking, it’s a good idea to create one generic account, maybe a class email account, that everyone logs in to. This means that you, as the teacher, are able to see everyone’s work all at the same time. The last thing you want to do is have to log in to 32 individual accounts to view your student’s progress or their finished tasks.
[bctt tweet=”Use one Adobe Spark account for all your students to log in to so you can preview their work easily.” username=”donnagolightly1″]
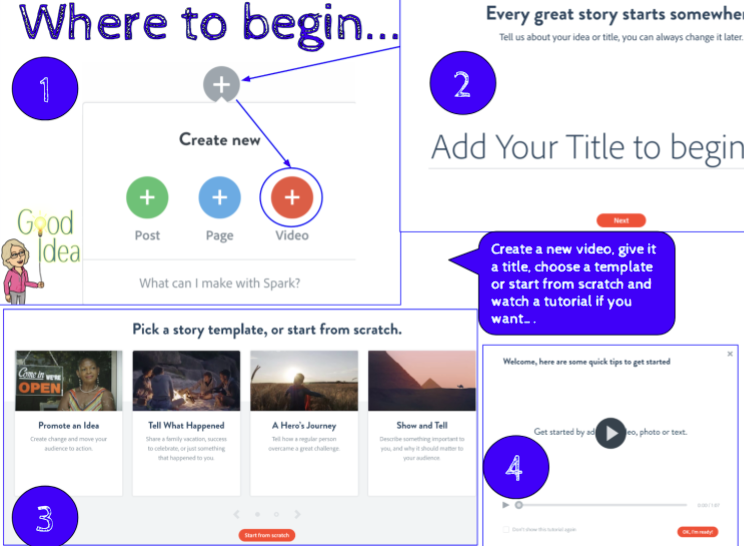
Once you have created your account, or logged in, the fun begins.
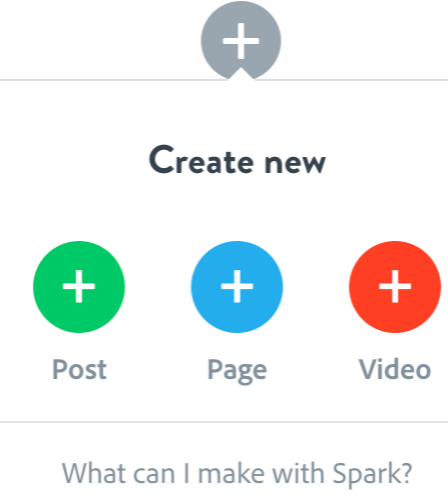
Decide which type of project you want to make:
Adobe has many templates, all designed for different outcomes, that you can use and adapt. You can also start your new project from scratch. The tools work the same way across all three to make it even easier for you and your students to manipulate and create awesome outcomes. Photos can be added from your device or there is a search tool that allows you to find images that you are legally able to reuse. Manipulate them with filters and experiment with different layouts.
[bctt tweet=”Adobe Spark has a range of templates and a library of photos you can use for free.” username=”donnagolightly1″]
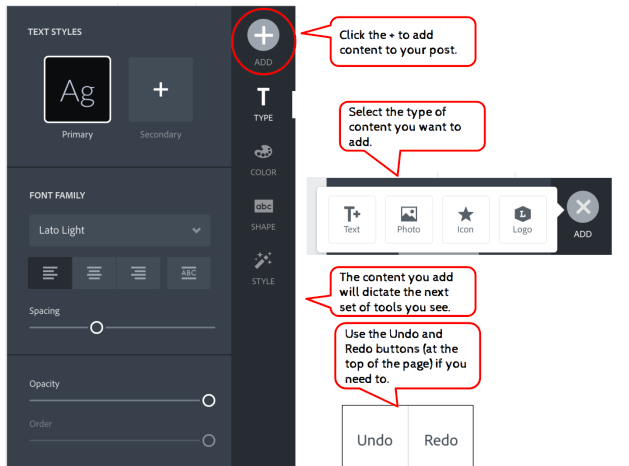
The text editing tools aren’t huge, but there is enough to allow you to personalise your work and choose effects that fit with the message you are wanting to convey. By clicking on the text you are able to move it around and reposition it to wherever you want it to be.
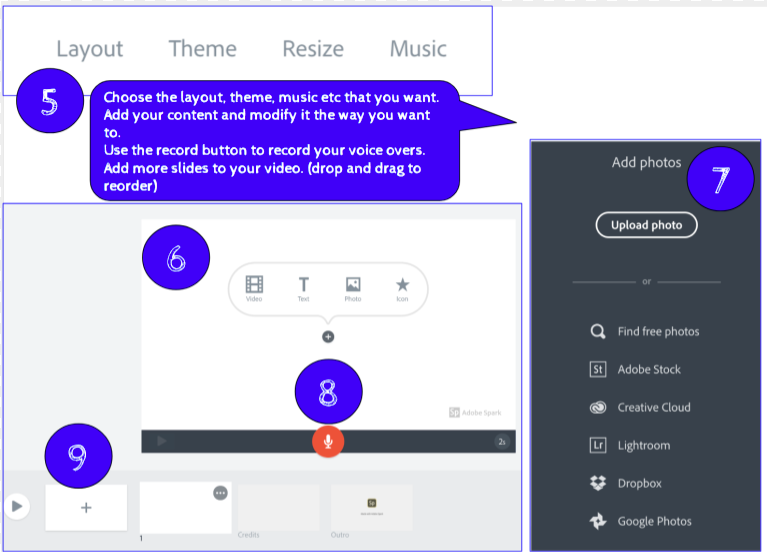
Spark suggests different layouts and designs for you, along with suggested colour palettes, or, again, you can choose your own.
The video tool allows you to choose how long you want each slide to be visible for. The drop and drag function allows you to reposition any of the slides as you build your presentation. There is a library of free music you can use for backing, or there is an option for you to upload your own. Photos can be added the same way as in the other two tools and you can even insert a video into your video! (Be warned – videos clips can only be 30 seconds long – but you can choose which 30 seconds you want to use.)
Icons can be inserted from the Noun Project and are free to use within the Adobe Spark range of tools.
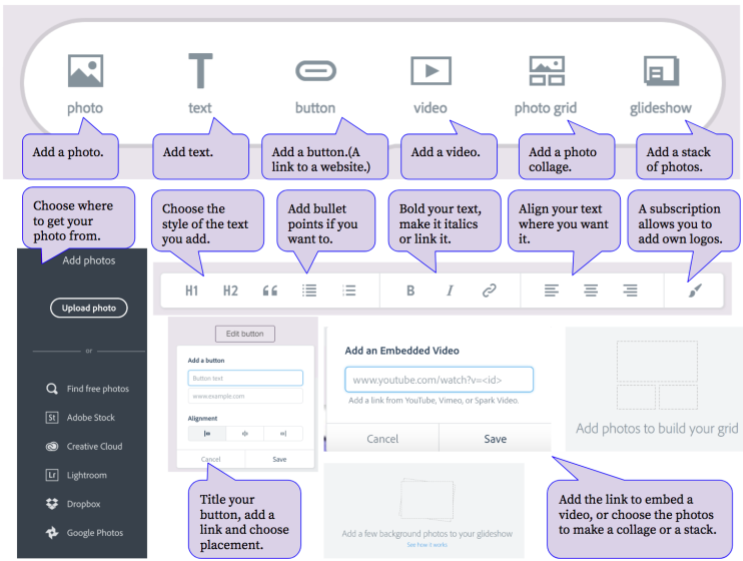
The Adobe Page tool is similar to Google Sites but has a very cool feature called the glideshow. It allows you to add text, videos, photos, and links on top of images as you glide over them.
You can see an example here (and learn some more about Adobe Spark tools while you go.)
Have a look at the image below to see what can be added to an Adobe Page.
One of the really appealing features of the Spark tools is that while your students are creating their Sparks all their work is being automatically saved for them. No more cries of, “I didn’t save my work!”.
Spark Posts can be downloaded as jpegs, videos can be downloaded as MP4s and the Pages can be shared with a link.
Give the tools a go – you’ll be amazed at just how easy they are to use.
For more tips and tricks on how your students can present their thinking check out Lara’s blog here on creating animations and Pecha Kucha presentations in Google Slides.


