


Integrating STEAM and robotics in the classroom can be expensive. Thankfully there are many low-cost options such as the BBC micro:bit which, with a little resourcefulness and tinkering can be a great tool to get started with. If you are new to the micro:bit be sure to check out this great overview. One issue with the micro:bit is that teachers quickly run out of ideas on how to use it and soon find themselves looking for ways to extend its use.
When purchasing micro:bits I recommend getting a few extras to open up more possibilities for your students.
Here are five great ways to extend your use of micro:bits without breaking the bank and encourage some creative thinking and resourcefulness amongst your students.
Idea One: Alligator Clips
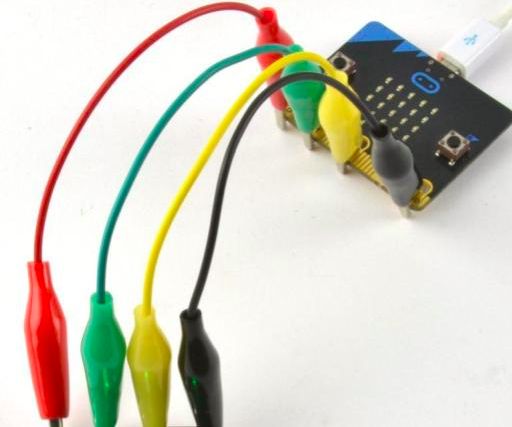
If you want your students to start making cool stuff with the micro:bits then things are going to get a little fiddly. The best thing you can buy is some Alligator/Croc clips as these will allow students to quickly add wires to the micro:bit and start the Timing Gate and Soil Moisture projects. The Alligator clips attach to the micro:bits ‘pins’ and power supply easily. If you do not have the clips your students will need to twist or tape the wire onto the pins and this is not always robust. If you are getting Alligator clips you should also invest in some wire strippers.
Idea Two: Servos
Some of the cooler projects on the micro:bit website involve a micro servo. This small piece of kit can open up a huge range of projects. A mini servo is a tiny moving mechanism that allows you to programme the micro:bit to create movement. At a low price point of around $7 NZD combining a servo with cardboard, old wire and other cheap materials, your students can make great projects like the Milky Monster, The Inchworm and the super fun Railway crossing.
The challenges with servos
Adding on a servo can be a bit scary for some as it involves some tinkering and problem-solving. The micro:bit site has a great explanation of how to get the servos ready for use. If you teach younger students enlist some older students to get this set up for you.

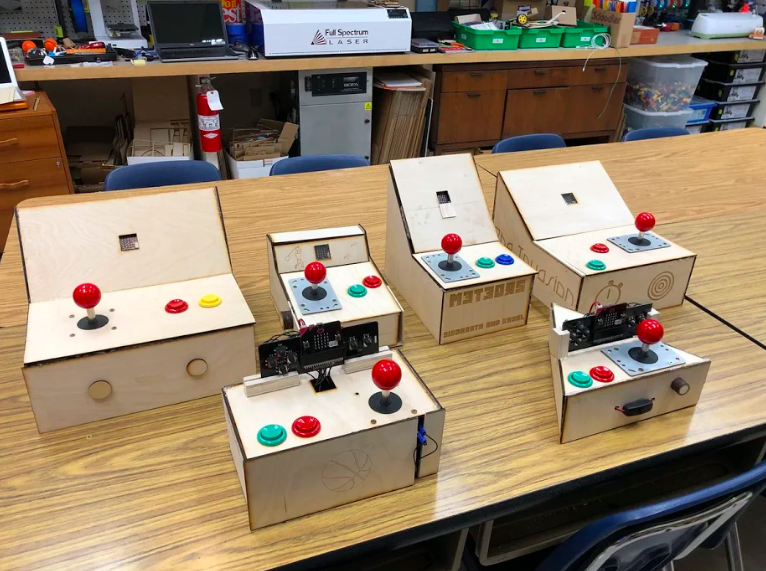
Idea Three: Arcade Buttons
You can basically add on any electrical parts you like to a micro:bit; lights, motors, mechanisms, fans and sensors can all be used. While the micro:bit has two buttons on it, sometimes these are too fiddly or you might need buttons to be somewhere else on your creation. You can purchase sets of Arcade buttons and wire them up (or even this ready to go Arcade set from Sparkfun) so that you can start exploring games and other interactive projects. Check out this guide on how to add buttons to your micro:bit.
[bctt tweet=”Arcade buttons are a must for any micro:bit classroom @microbit_edu #stem #utbpd” username=”MrTTHATCH”]
Idea Four: Expansion Board
When you start to dive deeper into the micro:bit by using multiple servos, buttons, lights and motors, things will become a little more fiddly. This may be a good time to move beyond alligator clips and purchase some Expansion Boards. If this sounds a little alien to you do not worry. This essentially allows you to cleanly ‘plug in’ multiple extensions to your micro:bit. The micro:bit comes with three ‘pins’ that you can connect external things too but with some expansion boards you can add up to 21 different components.

Idea Five: Inventor Kits
If you want to do all the above and more but do not feel totally confident wiring or you just want to get stuck in without too much shopping around for components, then you should consider purchasing some ‘inventors kits’ for your classroom. These kits come with edge connectors and a range of components which can be plugged in without any fuss.
My personal favourite is the Boson Kit by DFRobot which comes with a button, sensors, lights, servos and a motor. The best thing about it is that each component has a magnetic attachment so that students can attach it to cardboard without glue. They also have a lego attachment which allows students to add it to pre-purchased lego or 3D printed lego.

Sparkfun also do a great Inventors Kit which comes with much of the resources I mentioned above. The pack includes a servo, wires, lights and much more, making it a great kit for your class.
These kits cost more than the single components but the extra investment means you do not have to spend time prepping wires and visiting multiple suppliers to build up your class kit, ‘money spent = time saved’.
[bctt tweet=”The Boson Kit by @dfrobotcn is a great way to make the most of micro:bits @microbit_edu #stem #utbpd” username=”MrTTHATCH”]
Get Inventing
The Micro:bit is great by itself but with a few extra things it can launch your classroom into full-on inventor mode. Be sure to check out the micro:bit website for ideas and even look on Twitter and Pinterest for extra inspiration. The Microsoft STEM site also has some uses of the micro:bit which are sure to inspire.
Once you have some of the kit above be sure to check out this article on what STEAM could look like in your classroom
[bctt tweet=”Expand the possibilities of the @microbit_edu with these great tips! #utbpd #STEM” username=”MrTTHATCH”]


