


I recently spent three days working with staff and students at Waipahihi School in Taupo, New Zealand. While helping the teachers to introduce Google Classroom to their grade 3 and 4 students, I noticed that a lot of time was spent directing students to particular websites and assisting them to change settings on their Chromebooks.
The great thing about Chromebooks is that it is really quick and easy to customise the experience so that these little time wasters can be eliminated. This is exactly what we did at Waipahihi School and the impact was immediate! Not only were the students intrigued about ‘new’ things appearing on the Chromebooks, they were excited about how the changes made it easier for them. In this blog post, I’ll be sharing these five ways to customise Chromebooks to make them even easier for younger students.
Note: All of the changes below need to be made by your G Suite domain administrator. If that’s not you, I suggest sending this blog post to your administrator!
#1 Configure frequently used pages to load on startup
One of the biggest time wasters for classes of younger students can be ensuring they have all navigated to the website they need. An easy solution to this is to configure your school’s Chromebooks to automatically open a specific set of pages on startup. For example, Google Classroom and Google Drive. That way, as soon as students login to their Chromebooks they are ready to go!
Here’s what the setting looks like in the admin console.
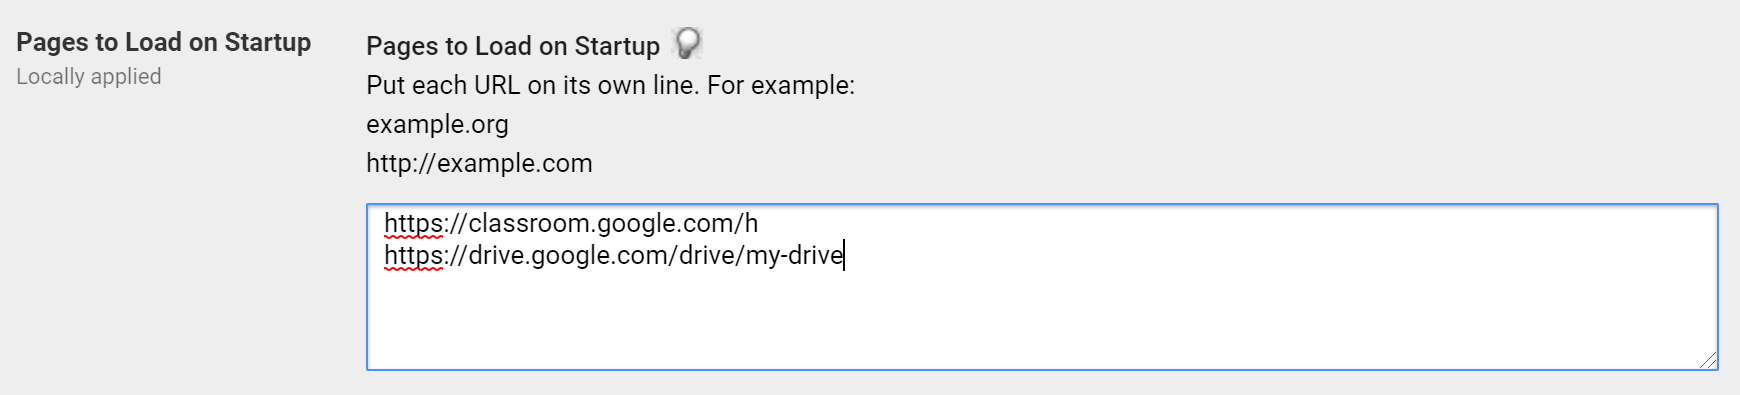
If your school has students organised into different organisational units based on their year level, you could also push out different sets of pages to different year levels.
This setting is located in Device Management > Chrome > User Settings > Startup.
[bctt tweet=”Configure your students’ #Chromebooks to automatically open a specific set of pages on startup! #gsuiteEDU” username=”samvardanega”]
#2 Enable the home button & configure the home page
By default, the home button is hidden on Chromebooks. However, this button can be really useful if you configure the home page to be whatever website your students will use the most. At Waipahihi School, this was Google Classroom. As such, we changed the settings to ‘Always show the “Home” button’ and set the Homepage URL to Google Classroom, as shown below.
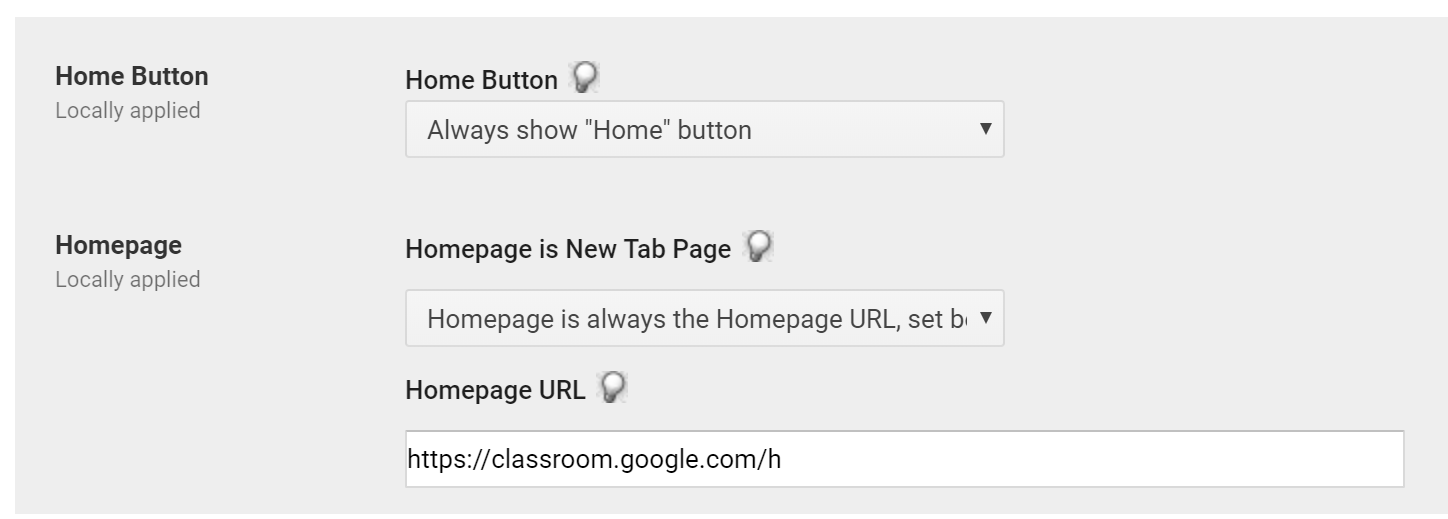
Changing these two settings made it super easy for students to quickly access Google Classroom if they had navigated away from it. They could easily find the new ‘house’ button and quickly learnt that the ‘house’ meant Google Classroom. It also meant the teacher only had to tell students to click on the ‘house’ when they wanted the students to navigate to Classroom.
This setting is located in Device Management > Chrome > User Settings > Startup.
[bctt tweet=”Set #Google #Classroom as the home page on your students’ #Chromebooks to make it quick and easy to access. #gsuiteEDU” username=”samvardanega”]
#3 Enable the bookmarks bar
The bookmarks bar is also turned off by default on a Chromebook. Turning it on for all students makes it much easier for them to save and find their favourite or frequently used web pages. After this setting had been enabled, we showed students how to use the ‘star’ button to save a page onto their bookmarks bar.

This setting is located in Device Management > Chrome > User Settings > User Experience.
[bctt tweet=”Did you know that you can automatically push out a whole folder of bookmarks to your students’ #Chromebooks? #gsuiteEDU” username=”samvardanega”]
#4 Push out a folder of bookmarks to the bookmarks bar
The managed bookmarks folder feature allows you to push out an entire folder of bookmarks to every student.You can also add, remove or edit bookmarks from this folder as needed. When combined with enabling the bookmarks bar (as explained above), it means student will see the folder on the bookmarks bar. My recommendation is to consult the teachers at your school to find out what websites and tools they use most often so you know what to add to this folder. If your school has students organised into different organisational units based on their year level, you could also push out different bookmarks to different year levels.
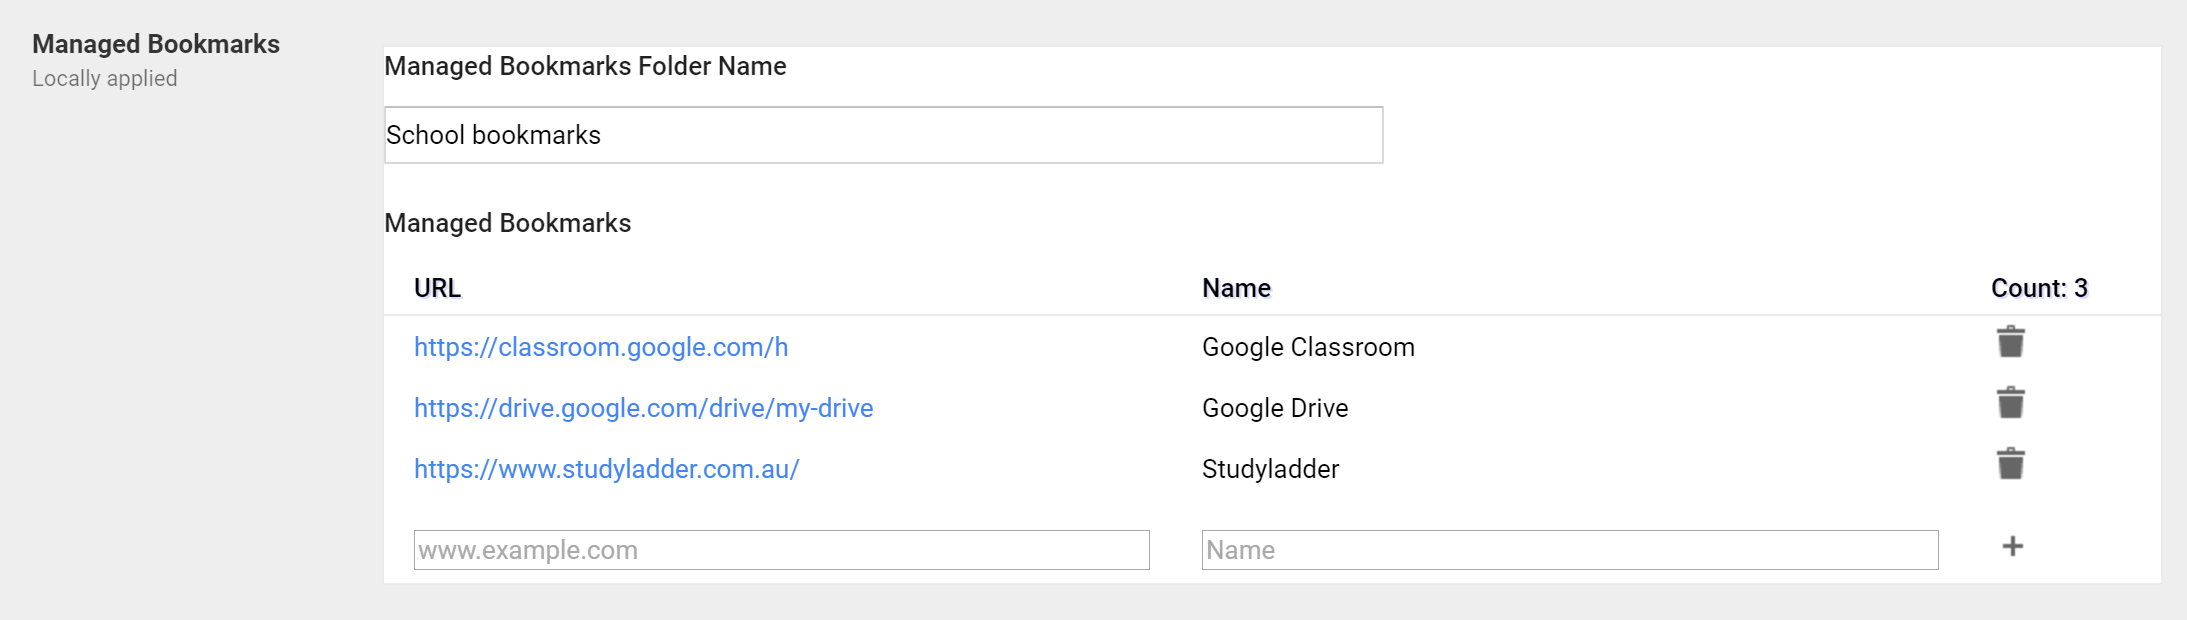
This setting is located in Device Management > Chrome > User Settings > User Experience.
#5 Show the logout button in the tray
Making sure that all students sign out of their Chromebooks at the end of the class can be a challenge! This is particularly important if students are sharing Chromebooks. An easy way to remind students to sign out, and make it simple for them to do so, is to make the sign out button very obvious. The setting below will put a big red sign out button in the tray, making it very easy for students to sign out. It was so obvious that almost all the students I worked with immediately asked me about it when they started their Chromebooks!

This setting is located in Device Management > Chrome > User Settings > Session Settings.
[bctt tweet=”Do your students forget to logout of their #Chromebooks? Here’s a setting that can help. #gsuiteEDU” username=”samvardanega”]
Spending ten minutes configuring these five settings will make Chromebooks even quicker and easier for students to use. This means that teachers can spend less time assisting students to navigate their devices and more time on actual teaching and learning activities!
Want to learn more about the Chromebook settings available in the G Suite Admin Console? Contact us today to book in your G Suite Admin Health Check.


